Mary Berry’s Tiramisu

Tiramisu | pajamabaker.com

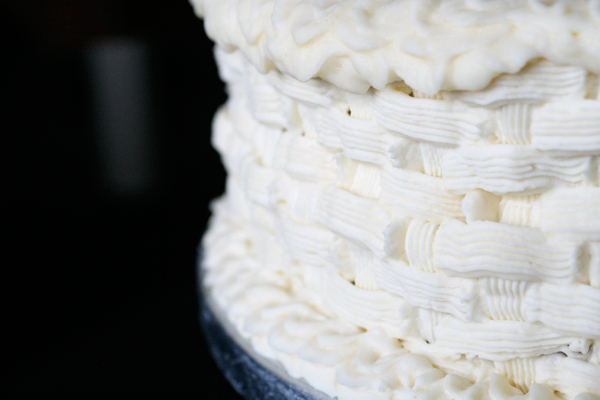
The Bake Off continues! This week, they made tiramisu, which is a fairly classic dessert but unfortunately I hate everything about it. I hate the taste of coffee. I don’t really like brandy-soaked sponge because it always seems soggy every time I eat it, and I have never understood why people would want to eat it!

But, keeping up with the challenges, I had to persevere. The real trick to this cake is to make sure you don’t over-beat the sponge so that it stays light and rises a lot. This will allow you to cut it in half more easily.  Also, take your time! Don’t try to rush it, as rushing will make you mess up and you won’t have the distinctive layers this cake needs.

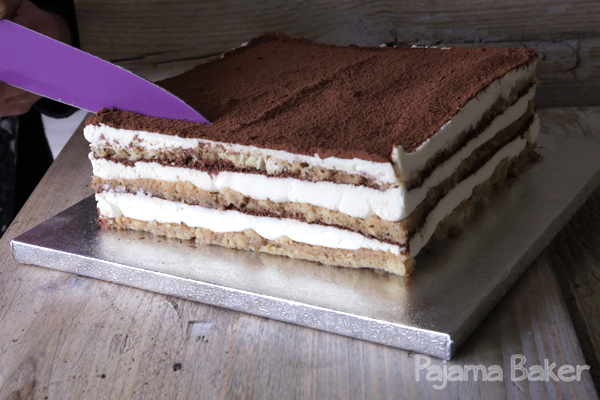
I didn’t have the right sized tins that the recipe calls for, so I only have three layers rather than the four it’s supposed to have, and my tempered chocolate came out all brittle and spotty so I left them off the top – but it still turned out beautifully, and one of the girls at work said it was the best tiramisu she’s ever had – so I must have done something right!

Mary Berry’s recipe below!

Tiramisu | pajamabaker.com

Ingredients

For the sponge:
  • 4 eggs
  • 100 grams sugar
  • 100 grams self-raising flour
For the filling:
  • 1 Tablespoon instant coffee granules
  • 150 ml boiling water
  • 100 ml brandy
  • 3 x 250g tabs full-fat mascarpone cheese
  • 300 ml double cream
  • 3 Tablespoons icing sugar,sifted
  • 75 grams dark chocolate, grated
For the decoration:
  • 100 grams dark chocolate, chopped
  • 2 Tablespoons cocoa powder

Directions

1. Preheat your oven to 350ºF (175ºC). Grease a 15×10-inch Swiss roll tin and line it with baking paper.

2. First, make your sponge. In the bowl of your mixer, whisk together the eggs and sugar for 5 minutes until the mix is very pale and thick. Gently sift the flour over your mixture, and gently fold it in using a spatula until it just combines. Do not overmix or your sponge will not rise enough!

3. Carefully pour the batter into your prepared tin, making sure to keep it level. Bake for 20 minutes until golden. Let it cool in the tin for 5 minutes before gently turning it out onto a wire rack to cool completely.

4. To make the filling, dissolve your coffee in the boiling water, then add the brandy. Set aside to cool.

5. When your sponge is completely cool, carefully slice it in half to create two thin layers of equal height. Then using the base of a 7-inch square cake tin, cut out two squares from each layer so you have a total of four squares.

6. Line the base and sides of your square cake tin with baking paper, leaving enough hanging over the edges that you’ll be able to use them to help lift your cake out of the tin when it’s set.

7. Set your mixer up with a clean bowl and place the mascarpone cheese into the bowl. Beat in your cream and icing sugar to make a creamy frosting that you can spread easily.

8. Place one square of your sponge into the base of the tin, spoon over one quarter of your coffee and brandy mixture, then spread one quarter of the mascarpone filling over the soaked sponge.  Scatter the top with a third of the grated dark chocolate. Repeat this process to create your layers for the second and third sponge squares.

9. For the final layer, place the fourth sponge square on the top of the layers and spoon over the rest of the coffee and brandy mixture. Spread a very thin layer of the filling to create a “crumb coat” on the top of the cake, then spread the rest of the filling layer on top in a thicker layer. The crumb coat will help keep any of the sponge bits from appearing on the top of your cake. Place the cake in the refrigerator to chill for at least 1 hour.

10. While the cake is chilling, melt half of your dark chocolate in a double boiler until it reaches a temperature of 127ºF (53ºC). Then remove the bowl of melted chocolate from the heat and add the remaining half of your dark chocolate, stirring until it melts in and it is thick enough to put into a piping bag. Once it’s in your bag, snip off a small corner and pipe to chocolate to make decorative shapes for the top of your cake. Leave the chocolate to set until you need it.

11. Dust the chilled tiramisu with the cocoa powder before you transfer it to your serving plate, using the baking paper to help you lift it out of the tin. Then place your chocolate decorative shapes on top, et voila!

Tiramisu | pajamabaker.com

Advertisement

Lemon and Poppyseed Bread

lemonpoppyseed03

Ben’s out of town in Scotland this week, so I’ve been left to my own devices. Normally I would just veg out on the sofa and enjoy being the sole controller of the remote. But this week I felt like being productive! Doing things! Checking things off my list! Which then all boiled down to baking again this week. I mean, it’s still a bit predictable, but certainly better than TV watching.

Since I was baking in the evening after work, I needed something relatively quick and simple. When perusing through some of the Pins I’d saved on Pinterest, I was immediately drawn to this recipe from Jaclyn at Cooking Classy: Lemon Poppy Seed Bread. My mouth literally began to water. And although my wedding diet certainly doesn’t allow for cake (especially after a few days of cheating over the weekend – grrrr!) I do know that I love lemon and poppyseed together, combined with poppies being on the brain from our volunteering at the Tower of London over the weekend, and the fact that it’s bread week on GBBO: I was sold.

lemonpoppyseed01

I will say, bread is a bit of a misnomer for this bake, as it’s not really a bread at all. It’s actually a loaf-shaped cake, but it’s denser like bread, so it slices beautifully. So it’s a sweet, cake-like loaf of bread. It’s all semantics anyways.

Ingredients

For the bread/cake:

  • 1 2/3 cup flour
  • 2 Tablespoons poppy seeds
  • 1 teaspoon baking powder
  • 1/2 teaspoon salt
  • 1 cup sugar
  • 2 Tablespoons fresh lemon zest
  • 1/2 cup (113 grams) butter, room temperature
  • 1/2 teaspoon vanilla extract
  • 1/4 cup + 2 Tablespoons sour cream
  • 1/4 cup milk
  • 2 Tablespoons fresh lemon juice
For the glaze:
  • 1/4 cup sugar
  • 3 Tablespoons fresh lemon juice

Directions

1. Preheat oven to 350° F (approx 175°C). Grease a loaf pan and set aside.

2. In a medium bowl, combine your flour, poppy seeds, baking powder, and salt. Mix them together well so that everything’s evenly distributed, then set aside.

3. In the bowl of your mixer, rub together the sugar and lemon zest until your sugar starts to turn a nice, pale yellow. (By the way, don’t try and work with fresh lemon juice and lemon zest with cuts on your fingers. It stings. A lot.) Add in your softened butter and vanilla, then turn your mixer on and blend together until everything turns nice and fluffy. Once fluffy, add in your eggs one at a time, scraping down the sides of the bowl in between each egg.

4. In a pyrex jug, mix together the milk and sour cream. Then gently heat it in the microwave for a few seconds until they are just slightly warm. Make sure it’s all blended together well!

5. Now, using the “muffin method” – add in your flour mixture and your milk mixture. Alternate adding each mix by adding 1/3 of the flour mixture, followed by half of the milk mixture, followed by 1 Tablespoon of your fresh lemon juice, mixing until they are just barely combined, then repeating until you’ve used everything up.  Make sure you finish with adding the final 1/3 of the flour mixture. (So – flour, milk, lemon, flour, milk, lemon, flour – got it?)

6. Pour your batter into your prepared loaf tin and pop it in the oven for 40 minutes. After that time, cover the top with foil (not letting it touch the loaf) and let it bake for another 5-10 minutes, until a cake tester comes out clean.

7. Once it’s finished, take your loaf out to cool in the pan for 5 minutes (ONLY 5 MINUTES!), then turn it out onto a wire rack. Then prepare your lemon glaze by microwaving the sugar and lemon juice in a small bowl for short bursts at a time. Whisk frequently to make sure you don’t burn the sugar. Once everything’s dissolved, you’re ready!

8. Using a pastry brush, gently brush the glaze over the top of your loaf. It makes it incredibly moist, as it soaks into the loaf. Plus, it’s all pretty and shiny just after you glaze it. Take your time with this step, as you want to use ALL of the glaze. Let it soak in, then reapply gradually through several coats.

lemonpoppyseed02
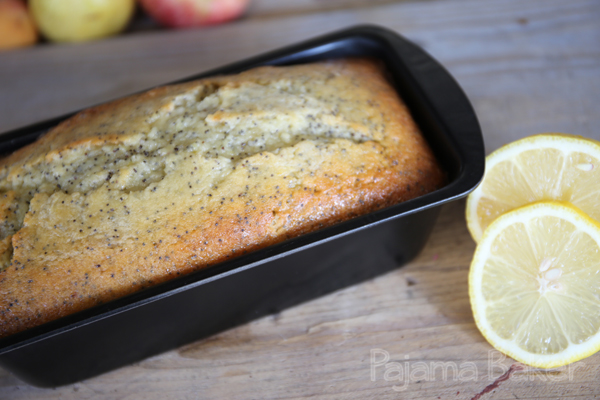
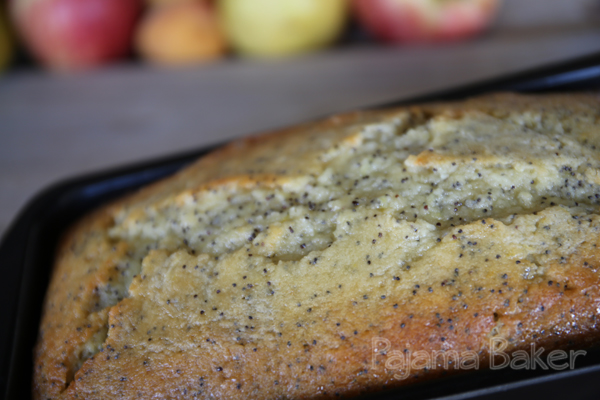
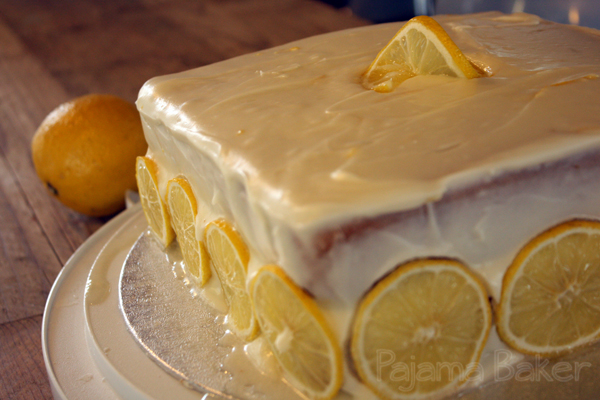
Once it’s ready, you can slice up your loafcake and serve it up. Just make sure to store it in an airtight container. I took mine into work the next day, so once it was completely cooled and the glaze was set, I popped it back into the tin to make for a nice presentation (and to make sure it didn’t get crushed during rush hour on the Tube!).

Well, I’m off to Edinburgh for the weekend to meet up with Ben after his week away. I will see you next week to share our adventures, bakers!


Mary Berry’s Cherry Cake


Cherry Cake | pajamabaker.com

You know how every Christmas there’s that song that plays touting December as the most wonderful time of the year? As much as I love Christmas, every summer about this time that song starts creeping into my head. Not because I’m anticipating the steadily approaching holidays, but because one of my favorite TV shows returns: The Great British Bake Off.  This year, for Series 5, they’ve actually moved the show to BBC One, which means a lot more exposure, and a lot more excitement!

In the first year I started this blog, I challenged myself to try one bake from each of the episodes in order to grow my skills and try my hand at some of the challenges in hopes of auditioning for GBBO.  It worked well then, (I got as far as the audition round) so I figured I’d give it another shot. Plus, it’s more motivation to keep baking each weekend (as if planning an international wedding wasn’t enough to keep me busy! Only 61 days to go!).

The first episode of the show focused on cakes, a relatively simple category, but it really allowed us to focus on meeting the new bakers this year. There are a few that I think have amazing talent, but one of them drives me absolutely up the wall! He is the most obnoxious person I could imagine meeting. I’m hoping he gets kicked off soon! Fingers crossed! The technical challenge for the episode was to make Mary Berry’s Cherry Cake, an almond-flavoured sponge with bits of cherries distributed throughout the cake.

The trick to putting the cherries in is to chop them into smaller pieces, then rinse, dry, and coat with flour. This helps the cherries “float” in the batter so that they don’t all sink to the bottom of the tin (eventually the top of your cake). This cake was super easy to make, although it didn’t rise as much as I would have expected, so I may double the recipe next time so that it makes more of a statement on the plate!

Cherry Cake | pajamabaker.com

Now before you start wondering about the crooked-looking cake, it’s actually my new cake stand, which was given to me as a bridal shower gift by one of my bridesmaids, Kelsie. It’s absolutely beautiful and I love that it has that quirky, not exactly perfect appearance. It just adds to the handmade nature of what’s being presented on it. After getting this stand, I found out they do it in two other sizes and heights, so I’m definitely adding those to my wishlist!

Cherry Cake | pajamabaker.com


Ingredients

For the cake:

  • 200 grams glacé cherries (or maraschino cherries if you’re in the States)
  • 225 grams self-raising flour (minus 2 Tablespoons, which you’ll use for the cherries)
  • 175 grams butter, softened
  • 175 grams sugar
  • the finely grated zest from 1 lemon
  • 50 grams ground almonds
  • 3 large eggs
For the icing:
  • 175 grams icing sugar
  • the juice from one lemon
  • 15 grams flaked almonds, toasted
  • 5 glacé cherries, cut into quarters (you can take these from the 200 grams used for the cake)

Directions

1. Preheat oven to 350° F (approx 175°C). Grease a bundt pan and set aside.

2. Cut all of your cherries into quarters, then rinse them under cold water so they aren’t sticky and turn them out onto some paper towels to dry. Make sure you set aside 5 of your cherries for the topping. Toss the rest of the cherries in your 2 Tablespoons of flour so that they’re evenly coated.

3. In your mixer, cream the butter and sugar until light and fluffy, then add in your eggs one at a time. Once mixed, add in your flour and ground almonds and mix in thoroughly. Remove your bowl from your mixer and fold in your flour-coated cherries and lemon zest by hand.

4. Pour your batter into you greased pan and bake for 35-40 minutes, until your cake tester comes out clean and the top is a lovely golden color. Let your cake cool in the pan for 10 minutes, then turn it out onto a wire rack to cool completely.

5. To make your icing, gradually add the lemon juice to your icing sugar so that it makes a thick paste. Carefully drip the icing over the top of the cake using a spoon. You want the icing to run down the sides a bit, but not completely coat the cake, so you’ll need it to be pretty thick.

6. Finally, top your cake with the toasted flaked almonds and your cherry bits.

That’s it! Easy peasy! (And Ben says it’s delicious!)

Cherry Cake | pajamabaker.com

Sweet Tea and Lemonade Cake

IMG_4285_sm


It has been incredibly warm this summer in London. And when you live in a house built in the 1930s that doesn’t have any air conditioning, it makes things heat up pretty quickly. It also makes icing cakes really difficult (as you can see from my terribly runny cake in the picture). But as hot as it gets outside and on the Tube, my office is an absolute icebox and I’m constantly cold – meaning I’m constantly wearing jackets and cardigans. While the Brits might give me awkward looks, it’s still pretty comfortable.

Growing up in Virginia, the summers easily got to be well over 90 or 100 degrees for days on end. Add the humidity to that, and you’re pretty much melting. The plus side? I’ve got a pretty high tolerance for summer heat. So I can get away with wearing a couple light layers while the rest of England starts stripping off as much as decently possible.

As promised, I’ve gotten into baking again, but the interesting bit is that I’m also on a very strict diet pre-wedding (skinny bride! skinny bride!) – so I can’t actually eat any of it. Thank goodness for work colleagues and a fiancé with a seemingly bottomless stomach!

This week’s bake comes from the latest issue of Southern Living magazine, and despite the melty frosting, it went down really well and was pretty simple!  Their recipe called to do it in a single-layer 13 x 9-inch pan, but I did mine in two 8-inch square pans and I think it just helped make it a bit more of a treat, but I’ve put the timings for both!


Ingredients

For the cake:

  • shortening (for greasing the pans)
  • 1 1/2 cups boiling water (about 1/4 litre)
  • 6 standard (or 3 family-size) teabags (I used English Breakfast)
  • 1 cup (226 grams) butter, softened
  • 2 cups (400 grams) sugar
  • 1/2 cup (85 grams) packed light brown sugar
  • 5 large eggs, room temperature
  • 3 1/2 cups (550 grams) flour
  • 2 teaspoons baking powder
  • 3/4 teaspoon salt
  • 1/4 teaspoon baking soda
For the frosting:
  • 1 (8-oz) package of cream cheese, softened
  • 1/4 cup (57.5 grams) butter, softened
  • 6 cups (about 500 grams) icing sugar
  • 1 Tablespoon fresh lemon zest
  • 3 Tablespoons fresh lemon juice

Directions

1. Preheat oven to 350° F (approx 175°C). Grease and flour your pans.

2. Pour your boiling water over the tea bags in a large glass bowl (or Pyrex jug) and let them steep for 10 minutes. After that time, remove the tea bags, squeezing the liquid out, and let the brewed tea cool for at least 20 minutes.

3. In your mixer, cream the butter and slowly add in the sugar until everything gets light and fluffy. Add your eggs 1 at a time, beating until just blended after each addition.

4. In a large bowl, mix together your flour, baking powder, salt, and baking soda. Alternate adding this mixture to your butter mixture with 1 cup of the cooled tea, making sure to begin and end with the flour mixture. Discard the remaining 1/2 cup of tea. Pour batter into your prepared pans, if using more than one pan, make sure you get them even!

5. If using a 13 x 9, bake for 35-40 minutes. If using 2 8-inch pans, I baked mine for 25 minutes, rotating the pans halfway through. Either way, your cake is done when your cake tester comes out clean and springs back a bit when you lightly touch it. If doing a layerd cake, remove from the oven and let cool in the pan for 10 minutes before turning out onto a wire rack to cool completely. If doing the 13 x 9, let the cake cool completely in the pan.

6. To make the frosting, beat the butter and cream cheese in your mixer until it starts to become creamy. Gradually add in your icing sugar, beating at low speed to help reduce giant messy sugar clouds. I find covering the mixer with a damp tea towel helps reduce it a bit. Once all your icing sugar is in, beat in the lemon zest and juice – then crank your mixer up to high and beat until the frosting is light and fluffy.

To decorate my cake, I used really thin lemon slices. However, they tended to leak some juice out – so you may want to set these out on a paper towel to dry out a bit so that there isn’t as much juice.

Hummingbird Cake

HummingbirdCake_LR

I’ve always seen recipes for hummingbird cake, but have never quite figured out exactly what it actually is. A cake with bananas, pecans, pineapple – surely it just seems bizarre! Like it’ll just be a big lumpy mess of cake! I never really understood the appeal, but decided to give it a shot after I saw this recipe on the cover of Southern Living.

This cake in particular has a cream cheese custard filling and what’s supposed to be browned butter frosting. But I chickened out in the middle of browning my butter – I didn’t want it to burn!

Despite my skepticism, this cake turned out pretty well! It was a big hit at work, so there must be something magical about the strange combination of ingredients.

Ingredients

For the cake:

  • 3 cups flour
  • 2 cups sugar
  • 1 teaspoon baking soda
  • 1 teaspoon salt
  • 1 teaspoon cinnamon
  • 2 cups chopped overripe bananas (about 3 medium bananans)
  • 3 eggs
  • 1 cup chopped toasted pecans
  • 1 cup vegetable oil
  • 1 8-ounce can crushed pineapple, undrained
  • 2 teaspoons vanilla
For the cream cheese custard filling:
  • 3/4 cup sugar
  • 1/3 cup flour
  • 3 eggs
  • 1 1/2 cups milk
  • 1 8-ounce package of cream cheese, softened
  • 1 Tablespoon vanilla
For the browned butter frosting:
  • 1 cup (230 grams) butter
  • 16 ounces icing sugar
  • 1/4 cup milk
  • 1 teaspoon vanilla

Directions

1. The night before, make your cream cheese filling. Whisk together first 2 ingredients in a heavy saucepan, then whisk in eggs and milk until smooth. Cook over medium heat, whisking constantly, 8 to 10 minutes or until mixture reaches a chilled pudding-like thickness. Bring to a boil, whisking constantly, and allow to boil for 1 minute. Remove from heat, and whisk in cream cheese and vanilla until cheese melts. Cool to room temperature (about 1 hour). Place plastic wrap directly on mixture (to prevent a film from forming), and chill 6 to 24 hours.

2. The next day, make your cake.Prepare 4 9-inch round cake tins by greasing and lining the bottom with baking paper. Preheat your oven to 350°F (175°C). Mix all of your dry ingredients together, then add in the rest of the ingredients to create a moist batter.

3. Bake for 20-25 minutes or until your cake tester comes out clean. Remove from the oven and allow to cool on a wire rack for 10 minutes, then remove the layers from their pans and allow them to cool completely. 

4. Put together your cake layers by spreading a portion of the cream cheese custard in between each layer. Cover your cake with plastic wrap and place in the fridge to cool while you make your frosting. 

5. Finally, make your frosting. Cook butter in a small heavy saucepan over medium heat, stirring constantly, 8 to 10 minutes or until butter begins to turn golden brown. (This is the part where I chickened out!) Remove pan immediately from heat, and pour butter into a small bowl. Cover and chill 1 hour or until butter is cool and begins to solidify.

6. Beat butter at medium speed with an electric mixer until fluffy; gradually add sugar alternately with milk, beginning and ending with sugar. Beat at low speed until well blended after each addition. Stir in vanilla.

7. Once your frosting is finished, frost your cake.

The frosting on my cake is called a basketweave. To do this, you’ll need A LOT of frosting, so you’ll want to double the recipe to make sure you have plenty to get the job done!