Chocolate Gingerbread Cake

GingerbreadCake_3

So I hadn’t mentioned this earlier, but I sent in an application for the next series of the Great British Bake Off. One day, I received a very interesting phone call – one of the people who works on the show; he asked me a few questions and then asked if I would like to come in for an in-person interview for the next round of auditions. Of course, I said yes!!

I don’t know how I managed to stay so calm during my interview, I’m pretty sure I was speaking a mile a minute and I felt like my heart was going to burst out of my chest. As soon as I got off the phone, I ran back upstairs to my desk at work with a grin bigger than the Cheshire Cat’s. I was going to audition. I had been selected out of thousands of applicants to have a chance to prove my baking skills.

I was given the instructions to bring some examples of my baking to show off my skills, and instantly my mind starting spinning – what should I make? I wanted something that would be a showstopper. Something that would represent me and my American-ness. Me and my Southern-ness. So I instantly thought to a recipe from Southern Living that I had been eyeing for some time – a chocolate gingerbread cake.

The following weekend, I did a trial bake to take to work for feedback. After a few suggestions and a bit of tweaking, I think I nailed my final recipe. I ended up making this cake three times – once for work as a trial, once for the audition, and a third time for Christmas Eve dinner to share with my family (who are probably more excited at my prospect than I am, as they immediately started planning out plot lines and how they’d ‘spin’ my story on the show).

Anyways, this cake does take a bit of time to prep and assemble. But it is worth it – it is so moist and delicious and it just looks and tastes like the holidays. Plus, the chocolate ganache and toffee layers in between the cakes are an extra decadent treat. The key is to take your time and try not to rush through.

As far as Bake Off goes, I’m awaiting the results to see if I’m invited to the next round – but hopefully this cake impressed! So, bakers, keep your fingers crossed!

Ingredients

For the cake:

  • 1 1/2 cups dark chocolate, chopped
  • 1 16-ounce package (450 grams) light brown sugar
  • 1/2 cup (115 grams) unsalted butter
  • 3 eggs
  • 2 cups (330 grams) flour
  • 3/4 teaspoon ginger
  • 1 teaspoon cinnamon
  • 1/2 teaspoon salt
  • 3/4 teaspoon allspice
  • 1/4 teaspoon nutmeg
  • 1 10-ounce (300 ml) container sour cream
  • 1 cup hot water
  • 1/4 cup black treacle or 1/2 cup molasses
  • 1 teaspoon baking soda
  • 2 teaspoons vanilla
For the chocolate ganache:
  • 2 cups dark chocolate
  • 1/4 teaspoon salt
  • 1 14-ounce can sweetened condensed milk
  • 2 Tablespoons (28 grams) butter
  • 1 teaspoon vanilla
  • 2 Tablespoons heavy cream
For the toffee layer:
  • 400 grams dairy toffee pieces
  • 1/4 cup (57.5 grams) butter
  • milk, if needed
For the ginger whipped cream:
  • 2 cups heavy cream
  • 5-6 1/8-inch slices peeled fresh ginger
  • 6 Tablespoons icing sugar
For decorating:

Directions

1. The night before you want to bake your cake, prepare the ginger whipped cream. In a small saucepan over medium-high heat, cook the cream and ginger for 3-5 minutes of just until bubbles appear. Be sure not to let the mixture boil. Remove from the heat and let cool to room temperature. Once cool, place in a container to chill in the fridge for at least 4 hours, but overnight would be best. The colder your cream, the better it will whip!

2. When you’re ready to bake your cake, preheat your oven to 350°F (175°C). Butter and line 3 round cake tins with parchment paper, then butter the parchment paper. Next, begin your cake batter microwaving your chocolate in a bowl in 30-second bursts until melted. Be sure to stir the chocolate in between bursts to make sure it doesn’t burn!

3. In the bowl of your electric mixer, beat the brown sugar and butter at medium speed until well blended. Add eggs one at a time, followed by the melted chocolate, beating until it’s just blended.

4. Sift together the flour, ginger, cinnamon, salt, allspice, and nutmeg. Gradually add this flour mixture to the chocolate mixture, alternating with the sour cream. Make sure to begin and end your additions with the flour mixture. Beat at a low speed until everything just comes together. Next, stir together the hot water with the black treacle/molasses as well as the baking soda (this mix will foam a bit). Gradually stir the molasses mixture into the rest of the batter, as well as adding in the vanilla. Once your mixture is blended together, spoon the batter evenly into your 3 prepared cake tins.

5. Bake the cakes for 25-30 minutes, or until a cake tester comes out clean. Cool the cakes in the pans on a wire rack for 10 minutes before turning out to cool completely (about an hour).

6. When the cakes are nearly cool, prepare your toffee mixture. In a glass bowl over simmering water, place your toffee pieces and butter together. Gently heat until the butter and candy begins to melt and become runny. You’ll need this to have a fairly runny consistency in order to spread over your cake. If you need to, you can add more butter or a bit of milk to help lighten the consistency. Once the toffee is melted, quickly spread a layer over the top of two of your cakes. Be careful not to work it too hard as it cools, because it can tear your cakes.

GingerbreadCake_2

7. Next, make your chocolate ganache. Similar to the toffee, melt your chocolate pieces and salt in a bowl over simmering water. Once everything is melted, add in the sweetened condensed milk; cook for 1-2 minutes, stirring constantly until everything is smooth. Remove from the heat, then add in the butter and vanilla, stirring for 4-5 minutes until smooth. Let the ganache cool to room temperature before transferring to another bowl. Add in the cream and beat with a hand mixer on high speed until it reaches the consistency of buttercream. If you need to, you can add a bit of icing sugar to help with the consistency. Once it’s ready, spread the ganache over your toffee layers.

8. Once all of your cakes are toffee-d and ganache-d, layer them up so that the cake with nothing on it is the top layer. Then whip up your chilled ginger cream to make the frosting. Pour the cream through a fine mesh strainer to remove the ginger pieces. Beat with a hand mixer on high speed until the mixture starts to foam. Then add in your icing sugar and continue to mix on high speed until stiff peaks form. Use the whipped cream immediately and spread over your cake.

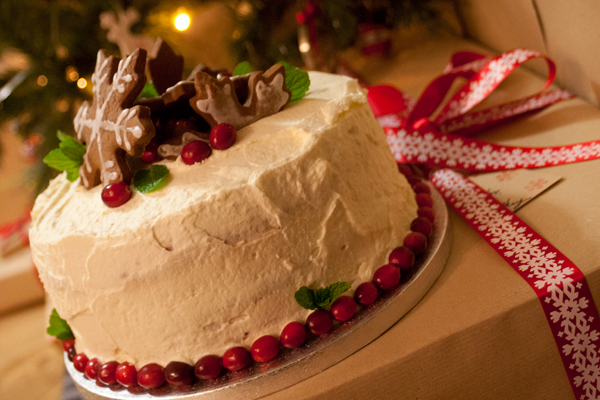
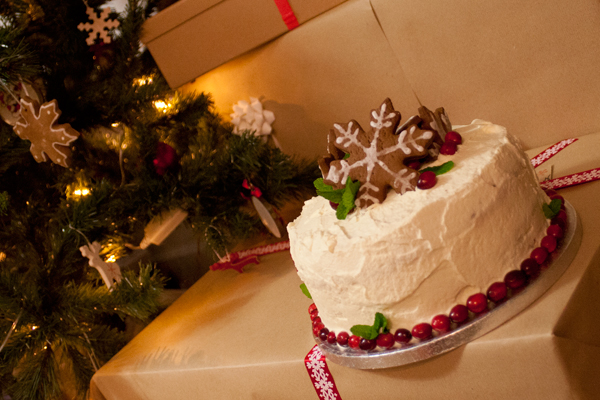
9. Finally, decorate your cake however you’d like using fresh gingerbread cookies, mint, and cranberries.

Advertisement

Pumpkin Cookies

Don’t say I didn’t warn you! I am seriously on a pumpkin spree. This week I made pumpkin cookies, which came out really puffy and soft, like fresh gingerbread. I think they’d be perfect drizzled with chocolate or, even better, in a pumpkin whoopie pie with a maple and pecan filling. Hmmmm, I may actually have to make those soon!

These cookies were delicious, and addictive. I think I ate about five of them! Big thanks to Diamonds for Dessert for the recipe!

Ingredients

  • 2 1/2 cups flour, sifted
  • 1 teaspoon baking powder
  • 1 teaspoon baking soda
  • 1 teaspoon cinnamon
  • 1/2 teaspoon nutmeg
  • 1/2 teaspoon salt
  • 1/2 cup (115 grams) butter, softened
  • 1 1/2 cups sugar
  • 1 cup canned pumpkin (or cooked and mashed up)
  • 1 egg
  • 1 teaspoon vanilla

Directions

1. Preheat oven to 350° F (approx 1750°C). Line a few cookie sheets with baking paper and set aside.

2. In a large bowl, sift together the flour, baking powder, baking soda, salt, cinnamon, and nutmeg.

3. In the bowl of your mixer, cream together the butter and sugar until light and fluffy, then beat in the eggs and vanilla. Once everything is incorporated, add in the pumpkin.

4. Stir in the sifted dry ingredients and mix until the dough forms. Spoon out even portions of the dough in about 2-Tablespoon sized portions (or you can use my favorite gadget, the cookie dough baller!).  Take a fork and dip it in a bowl of water and gently press the top of the ball down to form a criss-cross pattern and to form the dough into a slight oval.

5. Bake for 10-15 minutes until firm. They will get nice and puffy. Let them cool on the cookie sheet for about 2 minutes before moving to a cooling rack.

Pumpkin Cupcakes


Ask anyone who knew me growing up and they’ll tell you – Halloween is my favorite holiday. I used to go overboard making my own costume every year, determined to have the best one out of everybody. It’s a shame that Halloween isn’t really a “thing” here in the UK – it actually made me a bit sad not dressing up, carving a jack-o-lantern, or going to Halloween parties, pumpkin patches, or haunted hay rides. *note to self – must throw a Halloween party some year.

And fall is pretty much my favorite season from a culinary perspective. It marks the beginning of the best cooking and baking season that leads up to Christmas. One of the best seasonal ingredients is pumpkin. Cooking with pumpkin just instantly signals fall – so I special-ordered a few cans of pumpkin to load up for a few rounds of pumpkin baking.

As a Halloween treat to my co-workers, I decided this week to throw together a batch of pumpkin cupcakes with cream cheese frosting. As I was baking these on a weeknight and ended up staying up pretty late, I completely forgot to take photos. Luckily I had a photo from another time I baked these a few years ago. So while I apologize for the poor-quality photo, I will not apologize for the presence of Jack Skellington.

If anything, he just adds a bit of the Halloween spirit.


Ingredients

For the cupcakes (makes 24):

  • 2 1/4 cups flour, sifted
  • 1 Tablespoon baking powder
  • 1/2 teaspoon baking soda
  • 1/2 teaspoon salt
  • 1 1/2 teaspoons cinnamon
  • 3/4 teaspoon ground ginger
  • 1 teaspoon nutmeg
  • 1/2 cup (115 grams) butter
  • 2 eggs, beaten
  • 1 cup canned pumpkin (or cooked and mashed up)
  • 3/4 cup milk
For the frosting:
  • 1/4 cup (57.5 grams) butter, softened
  • 1 8-ounce package cream cheese, softened
  • 1 pound (1 box, about 4 cups) icing sugar, sifted
  • 2 teaspoons vanilla

Directions

1. Preheat oven to 375° F (approx 190°C). Place cupcake liners into the pan.

2. In a large bowl, sift together the flour, baking powder, baking soda, salt, ginger, cinnamon, and nutmeg.

3. In the bowl of your mixer, cream together the butter and sugar until light and fluffy, then beat in the eggs. Once everything is incorporated, add in the pumpkin.

4. Stir in the sifted dry ingredients, alternating each addition with the milk. Make sure everything is blended in and smooth before adding the next addition. If you’d like, you can also add in some chopped walnuts or pecans at this stage. Once the batter is completely mixed, fill your prepared cupcake pans – filling each cup about 2/3 full.

5. Bake the cakes for about 25 minutes, or until a cake tester comes out clean. Rotate the pans halfway through the baking time. Once they are ready, let them cool in the pan for about 5 minutes before transferring to a wire rack to cool completely.

6. To make the frosting, beat the butter and cream cheese in your mixer until it starts to become creamy. Then turn the mixer to low speed and gradually add in the sifted icing sugar. Finally, add in the vanilla and mix until it is completely blended. The consistency of this frosting is best spread on with a spatula, rather than piped. If you’d like a stiffer frosting, then add more sugar.

Apple Cinnamon Rolls


I found this recipe over a year ago and never got around to actually making them.  I love the idea of putting these into cupcake liners so that they’re in equal portions. I had to adjust the recipe a bit, as I found the dough to be a bit too sticky.  I’d also recommend chopping the apples a little rougher, as I completely lost the flavor of them once they baked.

These are great for breakfast or with an afternoon tea. Just beware, because they get quite sticky!

Ingredients

For the dough:

  • 2 cups milk
  • 1 package yeast
  • 1/3 cup sugar
  • 2 teaspoons salt
  • 8 cups flour
  • 2 eggs
  • 1/4 cup (115 grams) butter, room temperature

For the filling:

  • 1/4 cup (115 grams) butter, melted
  • 1 cup sugar
  • 1 cup brown sugar
  • 3 Tablespoons cinnamon
  • 1/4 teaspoon ground nutmeg
  • 1/4 teaspoon ground cloves
  • 2 cups chopped apples

For the glaze:

  • 1 cup icing sugar
  • approximately 2 Tablespoons milk

Directions

1. In a heatproof bowl, microwave the milk for 30 seconds, stir, then heat for another 30 seconds making sure the milk doesn’t boil. Remove from the microwave and let sit for a few seconds to cool enough that you could dip your finger in it.

2. In a large bowl, or the bowl of your mixer, mix the yeast and sugar. Add in the milk and continue to stir until everything dissolves. At the salt and 2 cups of flour and beat for two minutes.

3. Beat in the eggs and butter. Once they are combined, add in the flour a 1/2 cup at a time, making sure everything’s incorporated before adding the next part. Once all the flour is in, knead the dough for about 5 minutes.

4. Coat a large bowl with a thin layer of cooking oil. Then place the kneaded dough, cover, and set in a warm place to rise for about 40 minutes, or until it is doubled in size.

5. While the dough is rising, mix all of the ingredients for the filling except for the butter in a small bowl.

6. Dust your work surface with flour, then roll out your dough into a rectangle until it’s about 1/4-inch thick. Brush the top of the dough with the melted butter (reserving a bit for later), then sprinkle the filling mixture over the top, leaving about an inch of empty space around all the edges. Gently press the topping into the dough a bit so that it doesn’t move around when you roll it up.

7. Roll the dough into a log, beginning at the long edge of the rectangle. Then slice the log into 24 pieces. Place each slice into a cupcake tin with cupcake liners in each well, folding the edges together into a ‘C’ shape. Cover with a clean towel and set to rise in a warm place for another 40 minutes.

8. Once the dough has risen, preheat your oven to 350°F (175°C). Brush the tops of each of the rolls with melted butter, then place in the oven to bake for about 20 minutes, until the tops are golden.

9. Let the rolls cool before coating with a glaze made from icing sugar and milk.


Hot Cross Buns

As it comes up to Easter, all of the grocery stores around the UK start selling hot cross buns. So I figured I’d give them a go, having never had one in my life. They turned out alright, except that I’m pretty sure I overworked the dough a bit, so be sure to avoid that!

Ingredients

  • 3/4 cup milk
  • 1 envelope active dry yeast
  • 1/2 teaspoon sugar
  • 3 3/4 cups flour
  • 1/4 cup light brown sugar
  • 1 teaspoon cinnamon
  • 1/4 teaspoon ground cloves
  • 1/4 teaspoon ground allspice
  • 1/4 teaspoon ground nutmeg
  • 1/2 teaspoon salt
  • 1 1/2 teaspoon freshly grated orange zest
  • 2 eggs
  • 1/4 cup unsalted butter, at room temperature
  • 1/2 cup raisins
  • 1 tablespoon milk
  • 1 egg
  • 1 tablespoon milk
  • 1/2 cup icing sugar, sifted

Directions

1. Heat the 3/4 cup milk until lukewarm, then gently stir in the yeast and 1/2 teaspoon of sugar. Allow to sit for 10 minutes until it gets foamy. If the yeast does not foam, it is either too old or the milk was too warm, so dump the mixture and start again.

2. In a large bowl, combine the flour, brown sugar, cinnamon, cloves, allspice, nutmeg, salt and orange zest.

3. Create a well in the middle of the flour mixture and pour in the milk and yeast mixture. Mix until combined, then add 2 eggs and mix until the yolk disappear. Add the butter and raisins then mix for about four minutes, until the dough is smooth and elastic.

4. Place the dough into a large bowl coated with oil, cover with a clean towel, and place in a warm place to rise for about 1 1/2 hours or until doubled in size. (If your house is chilly, like mine, I suggest putting the bowl into a cool oven and placing a dish full of hot water below it. If it’s a sunny day though, a warm window sill works well!) 

5. Once the dough has risen, punch it down once, and turn it out onto a lightly floured work surface.

6. Divide the dough into 12 equal pieces and form each piece into a round ball. (I used a scale to make sure everything was even.) Place each ball onto a baking sheet lined with baking parchment, making sure they are evenly spaced.

7. In a small bowl, whisk together 1 egg and 1 tablespoon of milk. Brush the tops of each dough ball with the mixture, and save the remaining egg wash. Place a clean towel over the tops of the rolls and set in a warm place to rise for 30 minutes.

8. Preheat the oven to 400°F (200°C). Then brush the tops of the rolls again with the egg wash before placing in the oven to bake for 10 to 15 minutes, or until golden brown.

9. Allow the rolls to cool completely on the baking sheet, then combine the icing sugar and 1 tablespoon of milk. Place the mixture into a pastry bag (or a Ziploc bag with the corner snipped off), and pipe a cross over the top of each cool bun.