Mary Berry’s Florentines


florentines04 florentines07This week was biscuit week on Great British Bake Off and the technical challenge that the bakers had to complete were Mary Berry’s florentines.  Now, to help clarify, in the UK, biscuits aren’t simply synonymous with cookies. Biscuits tend to be a bit crispy or crunchy, whereas a cookie tends to be softer and chewier, especially in the center. It gets extra confusing when they make savory biscuits (with cheese and stuff in them), because in my head, those are crackers. Cookies are sweet and they certainly don’t have cheese in them!  Oh well, another one of those epicurean curiosities of living in another country.

I decided to continue in my theme this season and follow along with all of the technical challenges, so I looked up Mary’s recipe that was used for the show to give these nutty, fruity, crunchy biscuits a go.  They were a bit trickier than last week’s cherry cake, but that’s because you have to be very precise when measuring them out so that they’re all equal. And even then, a couple of mine spread unevenly.


Ingredients

  • 50 grams butter
  • 50 grams demerara sugar (this is brown, unprocessed granulated sugar, sometimes called raw sugar in the States.)
  • 50 grams golden syrup (this is a sort of maple-syrup type thing, but lighter. You could substitute a really thick honey for a similar flavor.)
  • 50 grams flour
  • 25 grams dried cranberries or glacé cherries, finely chopped
  • 50 grams candied peel, finel chopped
  • 25 grams almonds, finely chopped
  • 25 grams walnut pieces, finely chopped
  • 200 grams plain chocolate, chopped into chunks
florentines01Directions

1. First, preheat your oven to 350° F (175°C). Line a few baking trays with baking paper, and set aside.

2. In a small pan over low heat, add the butter, sugar, and golden syrup. Heat gently until the butter melts. Once melted, remove the pan from the heat and add in the rest of your ingredients (except the chocolate!). It’ll form into a sticky, gooey mixture.

3. Now this is where it gets a bit tricky. You need to divide the dough into 18 biscuits. In theory, you could just add up all the weights and divide by 18 (so 18 grams each), but nope! Because the mixture is so sticky, you’re bound to lose a bit of weight to bits getting stuck to your hands or spoon or everything. So I measured mine out to be between 15 and 16 grams each to be sure I had that covered. Place each of your 18 dough balls evenly across your prepared baking sheets, making sure there’s plenty of room for them to spread.

florentines09

florentines08

4. Bake for 8-10 minutes, until they turn a dark, golden brown around the edges. Remove them from the oven to cool, then carefully move them to a wire rack for the next stage. To quote Mary, the should have a “nice lacy texture” to them, with the edges uneven and you should be able to see through them a bit.

5. Temper your chocolate by heating half of it in a heatproof bowl over a pan of water on medium heat. Once it’s melted, remove the bowl from the heat and add in the rest of the chocolate. This should make your chocolate nice and shiny when it sets.

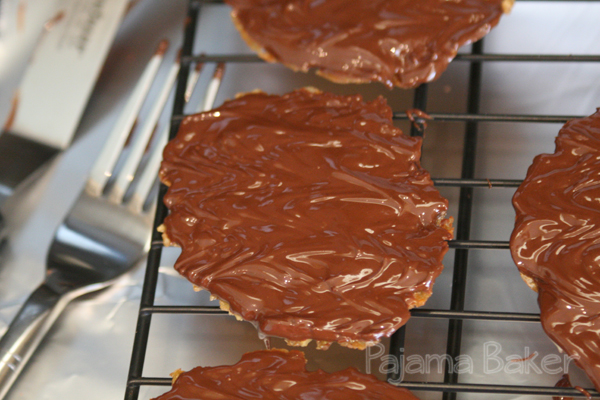
florentines02florentines066. Using a palette knife, or offset spatula, gently coat the underside of your biscuit with the chocolate, and then place it upside down on a wire rack to set. Once the chocolate begins to set up, drag a fork back and forth through the chocolate to create the “signature zig zag” look. Then allow the chocolate to cool and set completely.

florentines03


That’s it! Job done! I’m pretty sure my florentines would have landed me in the Top 5 for the technical challenge. 😉florentines05

Lemon Griestorte


Today has been a very long day. Ben left to go to a conference in Poland until Wednesday, so he was out the door before 6 a.m. to catch his flight. Unfortunately for me, I’m one of those people that once I’m awake, I’m awake. So I’ve pretty much been awake since about 5 a.m.  When I decided to actually roll out of bed 2 hours later, I was greeted by the most enormous spider I have ever seen!!!

I am absolutely terrified of spiders, so I found myself frozen in the doorway, facing off against this creature who was preventing me from entering my bathroom.   Normally Ben comes to my rescue (as he did last night when he went after another giant spider that had crawled under our bed), but he’d left hours ago and I was left to fend for myself. So what else could I do but start throwing shoes at it? It was the most logical solution.  Four tosses later, and the sucker was squished under one of Ben’s boat shoes, which is where he will stay until someone braver (i.e. Mr Moxey) comes home to dispose of the evidence.

I have no idea where all these spiders are coming from all of a sudden, but hopefully that will be the last one until at least Wednesday.

Anyways, back to business. This week on the Bake Off, the challengers made flourless cakes, or tortes. Originally I had planned to make a chocolate one, but I’m afraid that chocolate is the absolute last ingredient I want to have in the house at the moment. I spent all of Thursday touring around London visiting chocolate shops, gelaterias, and patisseries for a project at work and ended up getting really sick Thursday night and felt like crap most of Friday from eating so much rich, dark chocolate. So yeah, taking a break from that.

So to find a recipe for Plan B, I went to the Bake Off authority herself, miss Merry Berry. This recipe is from her Baking Bible, and uses whipped cream and lemon curd to make a delectable filling.

Ingredients

For the cake:

  • 3 large eggs, separated (you’ll need both the whites and yolks!)
  • 100 grams sugar
  • zest from 1 lemon
  • juice from 1/2 lemon
  • 50 grams fine semolina
  • 15 grams ground almonds
For the filling:
  • 300 ml whipping cream
  • 8 Tablespoons lemon curd
  • fresh raspberries
  • icing sugar

Directions

1. Preheat oven to 350° F (approx 175°C). Grease a deep round cake tin and line both the bottom and sides with baking paper. (I don’t have a deep tin, so I used 2 8-inch tins and halved the baking time. The layers were really thin, but it worked out alright.)

2. In a large bowl, whisk the egg yolks and sugar until they are pale and have a light texture. Add the lemon juice and continue to whisk until the mixture thickens. Fold in the lemon zest, followed by the semolina and ground almonds.

3. In a separate bowl (preferably with an electric mixer), whisk the egg whites until they form soft peaks, then fold into the egg yolk mixture until it’s evenly blended. Gently pour into your prepared baking tin.

4. Bake for 30-35 minutes or until it turns a pale golden brown (I did mine for 13 minutes in the two tins). Leave to cool in the tin for 10 minutes before removing and placing on a cooling rack to peel off the baking paper and cool completely. When cool, cut the cake in half horizontally.

5. Whisk the cream until it thickens and holds its shape, then fold in the lemon curd until it’s evenly blended. Spread half of this onto the bottom layer of your cake, then place a few raspberries around the cake. Add the second layer, then top with the rest of the whipped cream mixture.

6. Add a ring of fresh raspberries around the top, then dust with icing sugar to finish it off.

Cherry Bakewell Tart

Ben’s been asking me to make a Bakewell Tart for ages, so I finally decided to give in and do a bit of research.  Originally, I was going to make individual tarts a la Mr. Kipling, but the pastry recipe I used was just terrible. It kept ripping and tearing and just wouldn’t cooperate. In fact, the recipe was so awful that the first tart I made completely fell apart!

So for this week’s recipe, I won’t be posting the pastry recipe. It would just be cruel. Luckily, the second tart turned out beautifully and tasted AMAZING.

Ingredients

  • 500 grams shortcrust pastry
  • 100 grams butter
  • 100 grams sugar
  • 2 eggs, lightly beaten
  • 50 grams ground almonds
  • 50 grams flour
  • 1 teaspoon baking powder
  • 1 teaspoon almond extract
  • strawberry jam
  • 175 grams icing sugar
  • 1 – 2 Tablespoons milk
  • glacé cherries

Directions

1. Preheat oven to 400° F (approx 200°C). Lightly grease your pie tin, then roll out the pastry until it is about 1/8-inch thick. Gently lay the pastry over the tin and press into place. Lightly poke the pastry with a fork, being careful not to go all the way through the pastry. Bake in the oven for about 10 minutes to set, then remove from the oven and set aside while you make the filling.

2. In the bowl of your mixer, beat the butter and sugar until fluffy, then add in the eggs followed by the ground almonds.

3. Next, add the flour, baking powder, and almond extra. Mix to combine.

4. Spread the bottom of the baked pastry with a generous layer of strawberry jam, then fill with the almond batter. Bake for approximately 20 minutes.

5. Remove the baked pie from the oven and set aside to cool on a wire rack. Once it is completely cool, it’s ready to ice.

6. Make the icing by combining the icing sugar and milk, adding the milk slowly and only adding enough to make a thick but still runny icing. Pour over the cooled pie, being sure not to let it run over the sides, then dot the top with the glacé cherries.

Spiral Cookies

These cookies were certainly an experiment based off of a recipe that I found, which immediately reminded me of Pilsbury’s slice and bake cookies that used to hit store shelves for tons of different holidays. They’re a nice, crisp almost crumbly texture that reminds me a bit of shortbread. The almond flavouring is also a nice touch. The recipe calls to do this in a food processor, but I don’t have one, so I had to adapt a bit to make it work. The key to these is to be patient when rolling up the dough!! It’s actually a bit tricky and if you aren’t careful, they dough will crack.

Ingredients

  • 2 cups + 2 Tablespoons flour
  • 1/2 teaspoon baking powder
  • 1/4 teaspoon salt
  • 2/3 cup icing sugar
  • 1/4 cup sugar
  • 1 1/4 cups (285 grams) unsalted butter, cold and cut into cubes
  • 1 teaspoon vanilla
  • 1/2 teaspoon almond extract
  • food colouring
  • sprinkles

Directions

1. In the food processor, combine 2 cups of the flour, baking powder, salt, icing sugar, and sugar. Once combined, add the cubes of butter and process again.

2. Add the vanilla and process until the dough comes together in a ball. Divide the dough in half, and set half aside.

3. Add the almond extract, 2 Tablespoons of flour, and the food colouring. Process until combined and the colour is evenly distributed throughout the dough.

4. Roll out each half of the dough between two sheets of baking parchment or wax paper. Try and keep them squared and relatively the same size. This will make your life a LOT easier. Place each sheet of dough onto a baking sheet (still sandwiched between the paper) and place in the fridge to chill for about 2 hours.

5. Once chilled, remove the dough sheets from the fridge and remove the top sheet of wax paper from each one. Stack the sheets of dough on top of each other, trying to line them up as close as possible. Gently roll over the stacked dough a tiny bit just to meld them together, then trim the long edges with a sharp knife to even them up. Leave them to sit until they soften a bit.

6. When the dough is more pliable, gently roll the dough into a log, starting at the long end. Take your time at this part so that you don’t split or crack the dough!

7. Once rolled, completely coat the log of dough in sprinkles. The easiest way to do this is to pour all of the sprinkles out onto a large baking tray so that they don’t roll all over your kitchen. After coating, tightly wrap the dough in plastic wrap, then place in the fridge to chill again for a few hours. I left my dough in overnight just to be sure.

8. When the dough has thoroughly chilled, preheat your oven to 325°F (165°C).

9. Remove the log from the fridge and remove the plastic wrap. Using a sharp knife, slice the log into 1/4-inch (0.6 cm) thick slices. Place them on a baking sheet, leaving a lot of space around them, as they will spread a bit. Bake for 15 to 17 minutes. These cookies don’t turn golden brown, so be careful not to overbake.