Twisted Cinnamon Loaf

CinnamonLoaf_6CinnamonLoaf_7

Ben and I spent the weekend with friends in Edinburgh for the long Bank Holiday weekend. It was a fantastic trip! We saw some wonderful comedy shows as a part of the Fringe festival, and mostly ended up wandering around the city. It was so crowded with several different festivals going on all at once, but the weather was lovely and we were in good company.  All in all, a nice mini getaway before the fall kicks off!

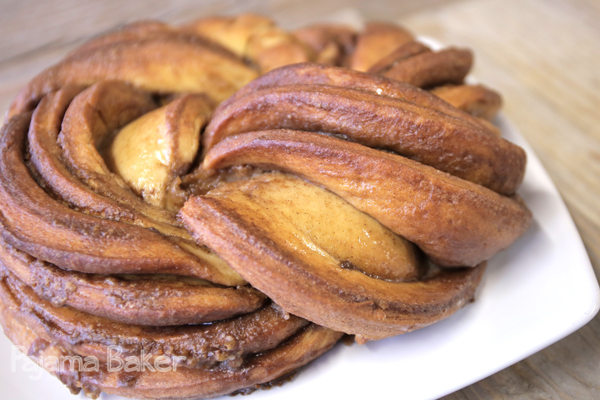
After last week’s bread episode of GBBO, I found myself really inspired to try my hand at making a filled loaf. I’d seen a photo on Pinterest for a twisted cinnamon loaf, but most of the recipes used canned cinnamon rolls and just didn’t seem all that appetizing. So about mid-way on hour hour-long flight home, I decided to give it a go.

Yes it is more effort than buying a can of cinnamon rolls. But it is all so simple, and you just feel better knowing that you made it yourself – that there are no preservatives or weird stuff mixed in. Plus, it was a nice way to keep the relaxing vibe from the weekend away.

Ingredients

For the bread dough:

  • 500 grams (3 1/2 cups) strong white flour (white bread flour)
  • 10 grams (1 teaspoon) salt
  • 50 grams (1/4 cup) sugar
  • 2 packages yeast (14 grams)
  • 30 grams (1 Tablespoon) butter
  • 2 eggs, lightly beaten
  • 50 ml (1/4 cup) warm milk
For the filling:
I just eyeballed mine, so all of these are approximate!
  • 75 grams (3 Tablespoons) very soft butter
  • 150 grams (3/4 cup) brown sugar
  • 1 1/2 Tablespoons cinnamon
For the glaze:
I just eyeballed mine, so all of these are approximate!
  • 65 grams (about 2 cups) icing sugar
  • A few Tablespoons of milk
  • A few drops vanilla

CinnamonLoaf_3BrownSugarBear
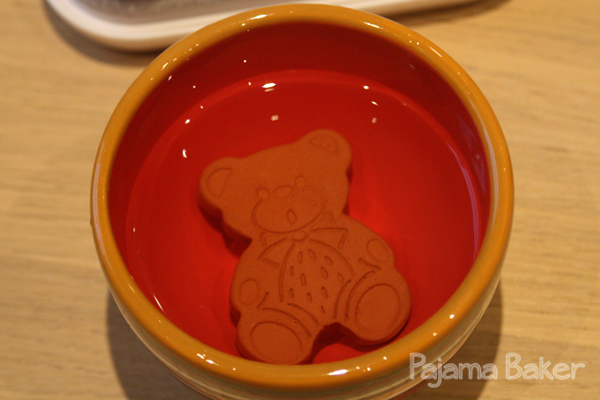
This little guy is my brown sugar bear – he’s ceramic and helps keep the brown sugar from turning to a brick. Just soak him for awhile in water, then toss him in your brown sugar container!


Directions

1. First, make your dough: Mix together all of your ingredients except the warm water. Be sure to separate when you add the salt and the yeast, because salt will kill your yeast and you won’t get a nice rise. Add about half of your water and let all the ingredients combine. Gradually add in the rest of your water until it all comes together into a dough.

2. Turn your dough out onto a lightly floured surface and knead it for about 10-15 minutes until it gets really smooth and stretchy. Lightly oil a large bowl with a bit of olive oil, then place your dough in, cover with plastic wrap or a clean towel, then leave in a warm place to rise for about an hour or so.  The dough should nearly double in size when it’s ready.

3. Now, the funs starts!  Prep a baking pan by lining with baking paper and set aside.  Re-flour your work surface and turn out your dough.

HowTo_1
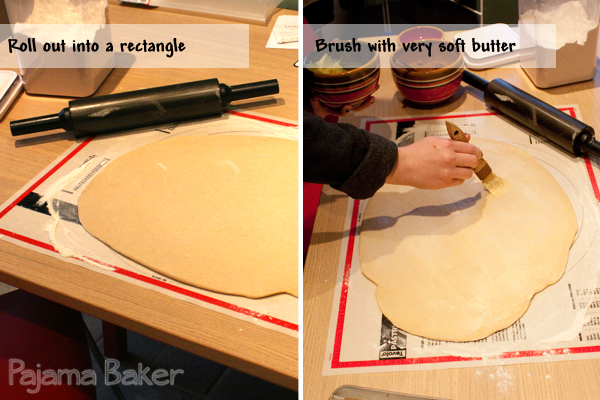
4. Grab your rolling pin and roll your dough out into a rough rectangle that’s about 1/4-inch thick. It doesn’t need to be perfectly square for the loaf to work, so don’t stress about it.

5. Then, using a pastry brush, cover the surface of the dough with a good hearty coating of your very soft butter.

HowTo_2
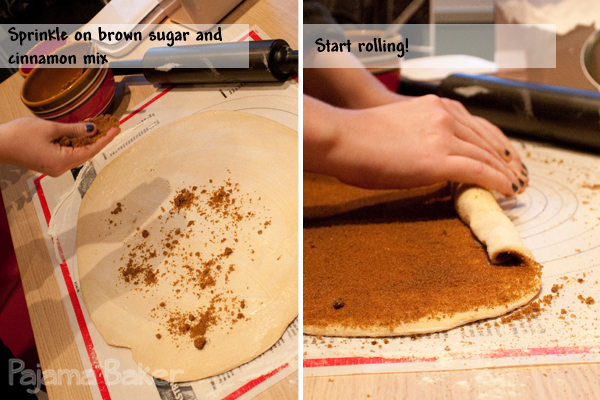
6. Cover the surface of your dough with your brown sugar and cinnamon mixture so that it all has an even coating. Be generous though, as the sugar will melt and create all of the delicious gooey-ness on the inside of  your loaf!

7. Next, roll up your loaf, making sure you roll with the longer edge, not the short one. You want to roll it relatively tightly so that you get a good spiral, but not so tight that the dough won’t have room to rise or bake properly.

HowTo_3
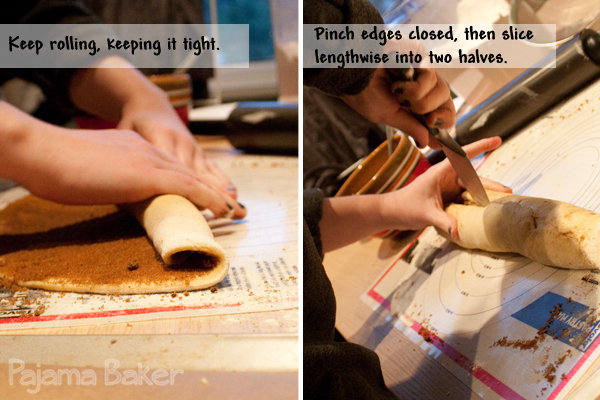
8. Once it’s all rolled together, pinch the seam closed, making sure it’s as sealed as possible.  Then, slice your log-like loaf down the entire length so that you get two halves.

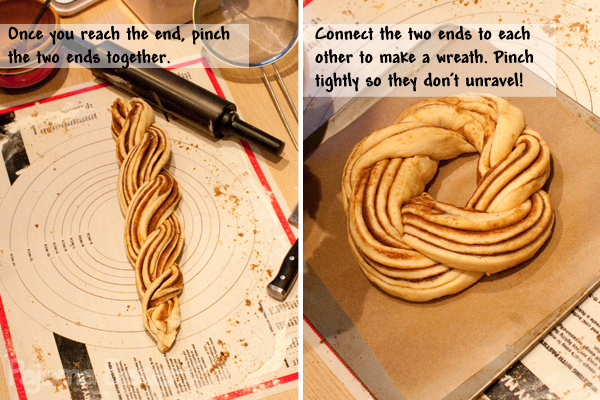
9. Pinch together the two ends of each of your halves, then start to twist them together, looping one over the other until you go down the entire length of your dough.HowTo_4
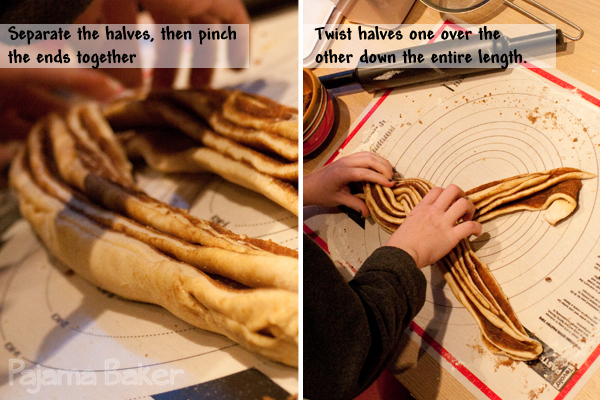
10. Once you’ve reached the other end, pinch those together as tightly as possible.

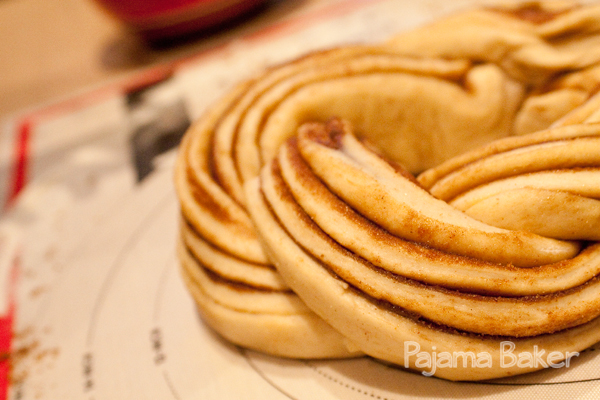
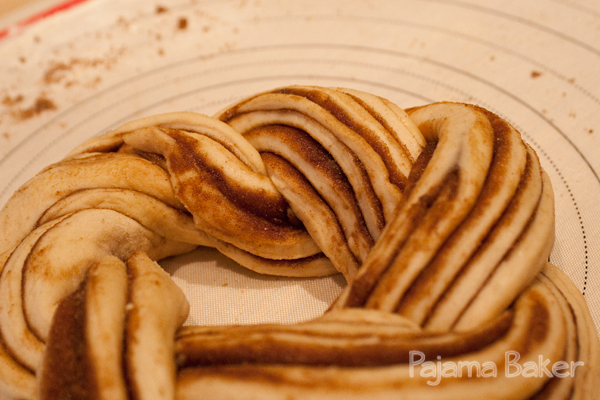
11. Carefully lift the two ends of your twist and bring them together to create a wreath shape. Now, make sure you seal off the two ends as best you can, so that the loaf doesn’t unravel in the oven!

HowTo_5CinnamonLoaf_5CinnamonLoaf_4HowTo_612. Mix together whatever’s left of your brown sugar and cinnamon mixture with your very soft butter. Pop it in the microwave for a few seconds so that it gets even softer, but not melted! Brush this mixture over the top of your loaf to add more delicious golden brown gooey-ness.

13. Preheat the oven to 325ºF (170ºC), then set your loaf in a warm place to rise for about 30 minutes while your oven preheats.

14. Bake your loaf for about 20-25 minutes, until it turns a really rich golden brown.

15. While your loaf is still warm, mix together the icing sugar and vanilla with a bit of milk, gradually adding the milk until you reach a very runny consistency. Brush this over your warm loaf, then allow it to cool (or not, just get stuck in!).
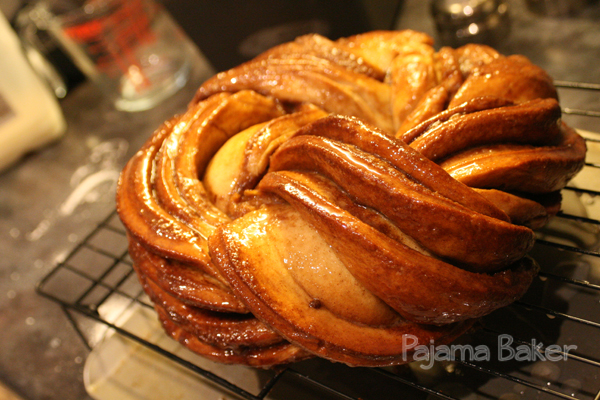
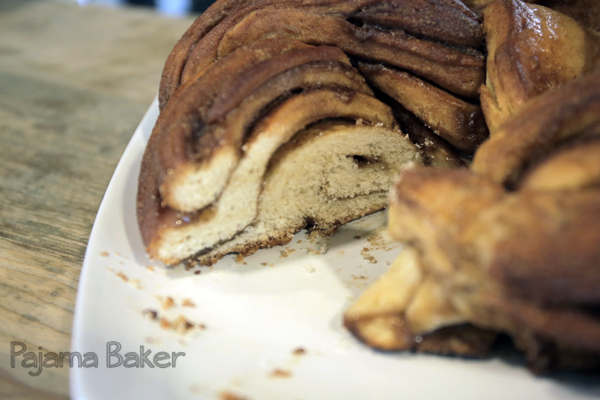
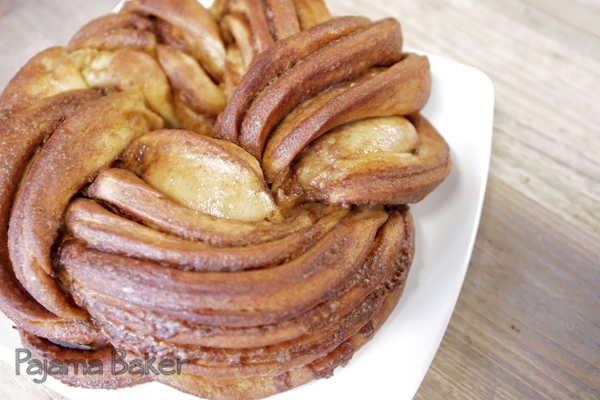
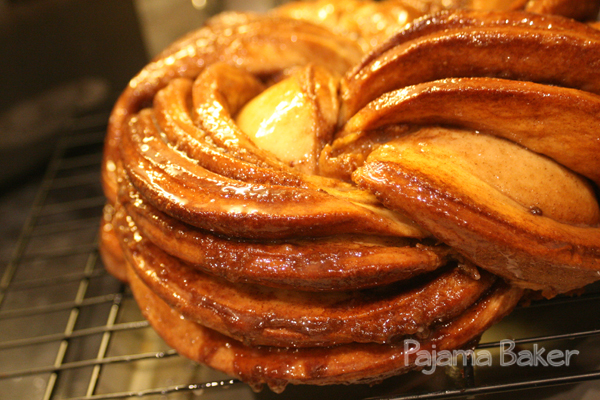
CinnamonLoaf_1CinnamonLoaf_2Mmmmmm, gooey.


Pumpkin Pie

PumpkinPie_3

I think I’ve finally settled into my new flat – it’s only been 2 months! Baking has proven to be a challenge, as the oven cooks a bit unevenly. I was so looking forward to this pumpkin pie until it caught a little bit and the wonderful even color on top got marred by a few dark spots. Oh well, still tasted delicious.

Pumpkin pie is a very American dessert it seems. Most people in our London office had never had it before, so I had to show them what they were missing!!

Ramping back up into baking regularly again since we’ve moved has been a bit of a test of willpower. I’ve recently joined a gym again and have been trying to be good about snacking – something that is incredibly difficult when you’re a baker! But I’ve been good and I’ve stuck to only sampling the tiniest of slivers. At least this time!

This pie is incredible, and tastes wonderful served with a dollop of whipped cream!

Ingredients

  • 1 batch sweet shortcrust pastry (I added a tiny bit of cinnamon to my pastry this time as well)
  • 3/4 cup sugar
  • 1 teaspoon cinnamon
  • 1/2 teaspoon salt
  • 1/2 teaspoon ginger
  • 1/4 teaspoon ground cloves
  • 2 eggs
  • 1 15-ounce can of pumpkin puree
  • 1 12-ounce can of evaporated milk

Pumpkin-Pie

Directions

1. Preheat oven to 350° F (approx 175°C). Roll and place your pastry into the pie dish. Gently prick the bottom with a fork (don’t go all of the way through though!), line with baking paper, then fill with your ceramic baking beans. Blind bake your pastry for 10-15 minutes, then set aside to cool. Once cool, remove the baking beans by lifting out the baking paper.

2. In a large bowl, mix together all of your sugar, spices, and eggs. Then add in the pumpkin. Once everything is combined, stir in your evaporated milk.

3. Place the pie in the oven to bake for 40-50 minutes. Keep an eye on it to make sure it bakes evenly. Test it with a cake tester to ensure it’s cooked all the way through. If you’d like to add a pastry garnish like the ones I’ve done, add the pastry cutouts about 10-15 minutes before the pie is finished baking so that you don’t burn them.

4. Once your pie is ready, let it cool completely, then serve with whipped cream!

PumpkinPie_2

Gingerbread Cookies

GingerbreadCake_1

Gingerbread cookies are probably the best cookies to make for Christmas. Really simple, just cut out and decorate with a bit of icing. I’ve actually made a bunch of these to use as Christmas ornaments on our tree, just up the spices a bit more so that they are a bit more aromatic and your house will smell wonderful as you’re making them.

Ingredients

  • 1 cup (230 grams) unsalted butter
  • 1 cup sugar
  • 1 1/2 teaspoons baking soda
  • 1/4 cup hot water
  • 1/2 cup black treacle or 1 cup molasses
  • 5 1/2 cups flour
  • 1 1/2 Tablespoons ginger
  • 1 1/2 teaspoons cinnamon
  • 1/4 teaspoon salt
  • 1/4 teaspoon allspice

Directions

1. In the bowl of your mixer, beat together the butter and sugar until light and fluffy.

2. In a separate bowl, stir together the hot water, baking soda, and black treacle/molasses.

3. Sift together the flour and the rest of the ingredients. With your mixer on low, gradually add in the flour mixture, alternating with the hot water mixture. You will start to get a pretty hefty dough, so be sure not to overwhelm your mixer. Once everything is mixed, place the dough in the fridge to chill for at least an hour.

4. Once the dough is chilled, preheat your oven to 350°F (175°C). On a lightly floured surface, roll out your dough until it is 1/4-inch thick. Then cut the dough into whichever shapes you choose using some cookie cutters. If you want to make them into ornaments, cut a hole in the dough for the ribbon before baking, making it larger than you actually need to allow for the expansion during baking.

5. Bake for 13-17 minutes until done. Don’t let the edges turn too dark brown, or else the cookies will be pretty brittle. Allow them to cool completely on wire racks before decorating.

Chocolate Gingerbread Cake

GingerbreadCake_3

So I hadn’t mentioned this earlier, but I sent in an application for the next series of the Great British Bake Off. One day, I received a very interesting phone call – one of the people who works on the show; he asked me a few questions and then asked if I would like to come in for an in-person interview for the next round of auditions. Of course, I said yes!!

I don’t know how I managed to stay so calm during my interview, I’m pretty sure I was speaking a mile a minute and I felt like my heart was going to burst out of my chest. As soon as I got off the phone, I ran back upstairs to my desk at work with a grin bigger than the Cheshire Cat’s. I was going to audition. I had been selected out of thousands of applicants to have a chance to prove my baking skills.

I was given the instructions to bring some examples of my baking to show off my skills, and instantly my mind starting spinning – what should I make? I wanted something that would be a showstopper. Something that would represent me and my American-ness. Me and my Southern-ness. So I instantly thought to a recipe from Southern Living that I had been eyeing for some time – a chocolate gingerbread cake.

The following weekend, I did a trial bake to take to work for feedback. After a few suggestions and a bit of tweaking, I think I nailed my final recipe. I ended up making this cake three times – once for work as a trial, once for the audition, and a third time for Christmas Eve dinner to share with my family (who are probably more excited at my prospect than I am, as they immediately started planning out plot lines and how they’d ‘spin’ my story on the show).

Anyways, this cake does take a bit of time to prep and assemble. But it is worth it – it is so moist and delicious and it just looks and tastes like the holidays. Plus, the chocolate ganache and toffee layers in between the cakes are an extra decadent treat. The key is to take your time and try not to rush through.

As far as Bake Off goes, I’m awaiting the results to see if I’m invited to the next round – but hopefully this cake impressed! So, bakers, keep your fingers crossed!

Ingredients

For the cake:

  • 1 1/2 cups dark chocolate, chopped
  • 1 16-ounce package (450 grams) light brown sugar
  • 1/2 cup (115 grams) unsalted butter
  • 3 eggs
  • 2 cups (330 grams) flour
  • 3/4 teaspoon ginger
  • 1 teaspoon cinnamon
  • 1/2 teaspoon salt
  • 3/4 teaspoon allspice
  • 1/4 teaspoon nutmeg
  • 1 10-ounce (300 ml) container sour cream
  • 1 cup hot water
  • 1/4 cup black treacle or 1/2 cup molasses
  • 1 teaspoon baking soda
  • 2 teaspoons vanilla
For the chocolate ganache:
  • 2 cups dark chocolate
  • 1/4 teaspoon salt
  • 1 14-ounce can sweetened condensed milk
  • 2 Tablespoons (28 grams) butter
  • 1 teaspoon vanilla
  • 2 Tablespoons heavy cream
For the toffee layer:
  • 400 grams dairy toffee pieces
  • 1/4 cup (57.5 grams) butter
  • milk, if needed
For the ginger whipped cream:
  • 2 cups heavy cream
  • 5-6 1/8-inch slices peeled fresh ginger
  • 6 Tablespoons icing sugar
For decorating:

Directions

1. The night before you want to bake your cake, prepare the ginger whipped cream. In a small saucepan over medium-high heat, cook the cream and ginger for 3-5 minutes of just until bubbles appear. Be sure not to let the mixture boil. Remove from the heat and let cool to room temperature. Once cool, place in a container to chill in the fridge for at least 4 hours, but overnight would be best. The colder your cream, the better it will whip!

2. When you’re ready to bake your cake, preheat your oven to 350°F (175°C). Butter and line 3 round cake tins with parchment paper, then butter the parchment paper. Next, begin your cake batter microwaving your chocolate in a bowl in 30-second bursts until melted. Be sure to stir the chocolate in between bursts to make sure it doesn’t burn!

3. In the bowl of your electric mixer, beat the brown sugar and butter at medium speed until well blended. Add eggs one at a time, followed by the melted chocolate, beating until it’s just blended.

4. Sift together the flour, ginger, cinnamon, salt, allspice, and nutmeg. Gradually add this flour mixture to the chocolate mixture, alternating with the sour cream. Make sure to begin and end your additions with the flour mixture. Beat at a low speed until everything just comes together. Next, stir together the hot water with the black treacle/molasses as well as the baking soda (this mix will foam a bit). Gradually stir the molasses mixture into the rest of the batter, as well as adding in the vanilla. Once your mixture is blended together, spoon the batter evenly into your 3 prepared cake tins.

5. Bake the cakes for 25-30 minutes, or until a cake tester comes out clean. Cool the cakes in the pans on a wire rack for 10 minutes before turning out to cool completely (about an hour).

6. When the cakes are nearly cool, prepare your toffee mixture. In a glass bowl over simmering water, place your toffee pieces and butter together. Gently heat until the butter and candy begins to melt and become runny. You’ll need this to have a fairly runny consistency in order to spread over your cake. If you need to, you can add more butter or a bit of milk to help lighten the consistency. Once the toffee is melted, quickly spread a layer over the top of two of your cakes. Be careful not to work it too hard as it cools, because it can tear your cakes.

GingerbreadCake_2

7. Next, make your chocolate ganache. Similar to the toffee, melt your chocolate pieces and salt in a bowl over simmering water. Once everything is melted, add in the sweetened condensed milk; cook for 1-2 minutes, stirring constantly until everything is smooth. Remove from the heat, then add in the butter and vanilla, stirring for 4-5 minutes until smooth. Let the ganache cool to room temperature before transferring to another bowl. Add in the cream and beat with a hand mixer on high speed until it reaches the consistency of buttercream. If you need to, you can add a bit of icing sugar to help with the consistency. Once it’s ready, spread the ganache over your toffee layers.

8. Once all of your cakes are toffee-d and ganache-d, layer them up so that the cake with nothing on it is the top layer. Then whip up your chilled ginger cream to make the frosting. Pour the cream through a fine mesh strainer to remove the ginger pieces. Beat with a hand mixer on high speed until the mixture starts to foam. Then add in your icing sugar and continue to mix on high speed until stiff peaks form. Use the whipped cream immediately and spread over your cake.

9. Finally, decorate your cake however you’d like using fresh gingerbread cookies, mint, and cranberries.

Pumpkin Cookies

Don’t say I didn’t warn you! I am seriously on a pumpkin spree. This week I made pumpkin cookies, which came out really puffy and soft, like fresh gingerbread. I think they’d be perfect drizzled with chocolate or, even better, in a pumpkin whoopie pie with a maple and pecan filling. Hmmmm, I may actually have to make those soon!

These cookies were delicious, and addictive. I think I ate about five of them! Big thanks to Diamonds for Dessert for the recipe!

Ingredients

  • 2 1/2 cups flour, sifted
  • 1 teaspoon baking powder
  • 1 teaspoon baking soda
  • 1 teaspoon cinnamon
  • 1/2 teaspoon nutmeg
  • 1/2 teaspoon salt
  • 1/2 cup (115 grams) butter, softened
  • 1 1/2 cups sugar
  • 1 cup canned pumpkin (or cooked and mashed up)
  • 1 egg
  • 1 teaspoon vanilla

Directions

1. Preheat oven to 350° F (approx 1750°C). Line a few cookie sheets with baking paper and set aside.

2. In a large bowl, sift together the flour, baking powder, baking soda, salt, cinnamon, and nutmeg.

3. In the bowl of your mixer, cream together the butter and sugar until light and fluffy, then beat in the eggs and vanilla. Once everything is incorporated, add in the pumpkin.

4. Stir in the sifted dry ingredients and mix until the dough forms. Spoon out even portions of the dough in about 2-Tablespoon sized portions (or you can use my favorite gadget, the cookie dough baller!).  Take a fork and dip it in a bowl of water and gently press the top of the ball down to form a criss-cross pattern and to form the dough into a slight oval.

5. Bake for 10-15 minutes until firm. They will get nice and puffy. Let them cool on the cookie sheet for about 2 minutes before moving to a cooling rack.