Orange Vanilla Monkey Bread

MonkeyBread2

Last week was my birthday, and Ben took me out for a day in London followed by dinner and drinks at a retro bowling alley with friends. Along with lots of cards from friends and family, I also received a surprise birthday package from my Aunt containing this:

Monkey


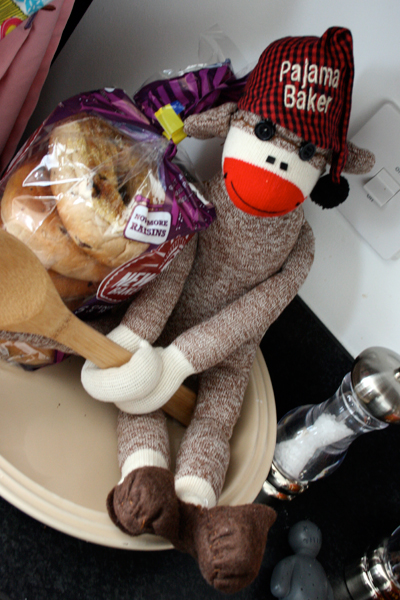
HOW ADORABLE IS HE?!?!?! I literally could not stop playing with him for at least an hour, posing him around the house to find a perfect spot for him to perch before finally deciding to put him in our pie dish (next to my bagels to take to work for lunch) so that he can watch as we cook. I don’t know what I love more about him, his little hat and slippers, or the fact he’s clutching a wooden spoon. Either way, he was a fantastic gift!

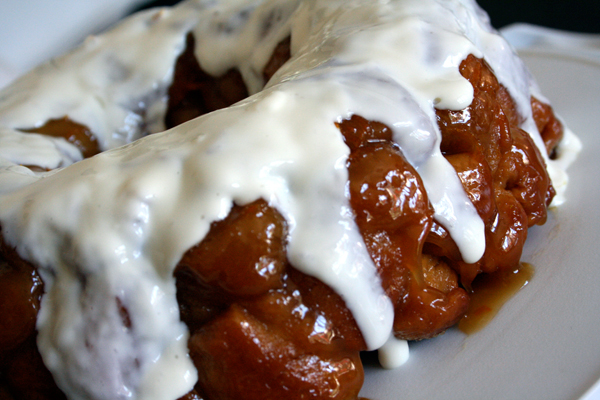
In honor of our newest houseguest, I decided to make an old family favorite: monkey bread. Except when I was looking for a recipe, I came across one from The Pioneer Woman, who I swear has some of the best recipes for everything. Given that I’ve used a lot of her recipes for dinners, I knew I couldn’t go wrong with her twist on sharing favorite: orange and vanilla.

I added my own little touch by making a quick cream cheese glaze to to drizzle over the top. Normally you make monkey bread with pre-packaged biscuit dough, but you can’t get that here in the UK; so I made up a quick basic dough to chop up and use instead and it was just as tasty.

This bread is great for a brunch, as you can put it in the center of the table and let everyone pick away at all the little bits. Just be sure to have plenty of napkins on hand for sticky fingers!

Ingredients

For the bread:

  • 3 tubes refrigerated biscuit dough
  • 1 cup sugar
  • 2 oranges, zested
  • a pinch of salt
  • 1 cup (230 grams) salted butter
  • 3/4 cup brown sugar
  • 1 Tablespoon vanilla
For the cream cheese glaze:
  • 1 8-ounce package cream cheese, softened
  • 3 Tablespoons icing sugar
  • milk, if needed

MonkeyBread

Directions

1. Preheat oven to 350° F (approx 175°C).

2. First, chop up all of your biscuit dough into small, bite-sized pieces. In a large zip-top bag, mix the sugar, salt, and orange zest; once they’re all mixed together, add in your biscuit dough pieces, seal it up, and give it a good shake to coat everything. Dump all of the biscuit pieces into a bundt pan and set aside.

3. In a pan over medium heat, melt the butter. Stir in the brown sugar and vanilla, stirring until they’re all combined. Don’t let the sugar mixture start to boil though! Once they’re mixed, pour the goo on top of all your biscuit pieces in the pan. Give the pan a bit of a shake to help everything settle.

4. Place the pan in the oven and bake for about 25 minutes, until the tops of the biscuits start to turn a golden brown. Remove from the oven and allow to cool in the pan for 10 minutes. Do not let it rest any longer or it’ll stick in the pan!  After the 10 minutes, turn it out onto your serving plate.

5. While the bread is baking, beat the cream cheese in your mixer on a medium-high speed until it becomes super creamy. Gradually add in your icing sugar, and dilute with a bit of milk until you get a sort of runny consistency. Basically, you want it to be able to drip it onto the top of the cake and only drizzle down the sides a bit – so you shouldn’t need to add too much milk. Remember, your hot bread will cause it to melt and become even runnier!

6. After turning the bread out of your bundt pan, let it sit for about 5 minutes before drizzling on the cream cheese glaze.

Cranberry, Orange, and Cinnamon Bagels

So a new season of Great British Bake Off has started, and I’m determined play along with the contestants. So each week for the next few weeks, I will be attempting at least one of their challenges. I missed the first episode in time to plan for baking last week, so I’ve had to pick it up on episode two, the one where they made bread.

One of the challenges this week involved making bagels, a dozen sweet and a dozen savory. I’m quite a fan of bagels, but I’ve never actually made them before.

Turns out that they’re relatively simple, just time consuming. So I actually spent my entire Bank Holiday Monday in the kitchen baking rather than relaxing, but it was totally worth it!!

Big thanks to Annie’s Eats for the base recipe, which was really easy to adapt for the different flavors I wanted. These turned out so fantastic that had I not planned on taking them to work, I would eat them for breakfast every day this week.

Ingredients

For the starter sponge:

  • 1 teaspoon instant yeast
  • 4 cups bread flour
  • 2 1/2 cups water, room temperature
For the dough:
  • 1/2 teaspoon instant yeast
  • 3 3/4 cups bread flour
  • 2 Tablespoons cinnamon
  • 5 Tablespoons sugar
  • 2 3/4 teaspoons salt
  • 1 Tablespoon brown sugar
  • 2 cups dried cranberries
  • zest from 2 oranges
For boiling:
  • 1 Tablespoon baking soda
  • cornmeal or semolina for dusting

Directions

1. First make the starter by mixing the yeast and flour in a large bowl. Slowly pour in the water, stirring until it forms a smooth, sticky batter. Cover the bowl with plastic wrap and let sit at room temperature for 2 hours until the mixture starts to form bubbles and get foamy. It should be about double in size.

2. Next make the dough by adding the additional yeast to the bowl with your starter. Then add in 3 cups of flour, cinnamon, sugar, salt, and brown sugar. Mix using your dough hook until the mixture forms a ball. As it starts to come together, slowly add the last 3/4 cup flour until the dough starts to stiffen. Then add in the cranberries and orange zest.

3. Knead the dough for about 10 minutes on the countertop. There should be no raw flour – all the ingredients should be hydrated.  If the dough seems dry and rips, add a few drops of water and continue kneading.  If the dough seems tacky or sticky, add more flour to achieve the stiffness required.  The kneaded dough should feels satiny and pliable but not be tacky.

4. Weigh the ball of dough, then divide the weight by 12. Then use that number to divide the dough into twelve rolls of equal weight. Cover the rolls with a damp towel and let them rest for about 20 minutes.

5. Line a few baking sheets with baking paper and spray with a small amount of oil. Form the dough rolls into bagel shapes either by rolling into snakes and then making into a loop, or just by poking a hole through the middle. Be sure to make the hole double the size than what you want the final hole to be, as they will close up a bit when rising and baking. Spray the tops of the bagels with a bit more oil, then cover with plastic wrap and let sit for another 20 minutes.

6. Your bagels will be ready for the next step when they pass the “float test”. Fill a large bowl with water and drop one of the bagels in – if it starts to float within 10 seconds, they’re ready. If not, return to the pan, re-cover with the plastic wrap, and allow them to rest longer, checking every 15 minutes to see if they float. Once they float, place the bagels in the fridge for at least 6 hours, or preferably overnight, to retard.

7. When you’re ready to bake, preheat the oven to 500°F (260°C). Bring a large, wide pot of water to boil, then add the baking soda. Line a few more baking sheets with baking paper, mist with oil, then lightly dust with the cornflour or semolina.

8. Remove the bagels from the fridge and gently drop as many that will comfortably fit into the water. They should float quite easily within 10 seconds. Boil for 1 minute, then flip and boil for another minute. Remove the bagels from the oven with a skimmer or slotted spoon.

9. After all of the bagels have been boiled, place in the preheated oven for 5 minutes, then rotate the two pans, lower the oven to 450°F (230°C), then continue to bake for another 5 minutes until they turn golden brown.

10. Remove the bagels from the oven and allow to cool for at least 15 minutes before serving. If you’re storing the bagels, they’ll keep for 2-3 days in a paper bag.