Macarons

Macarons

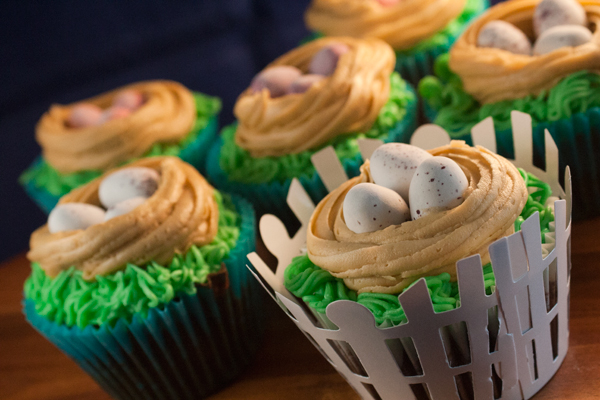
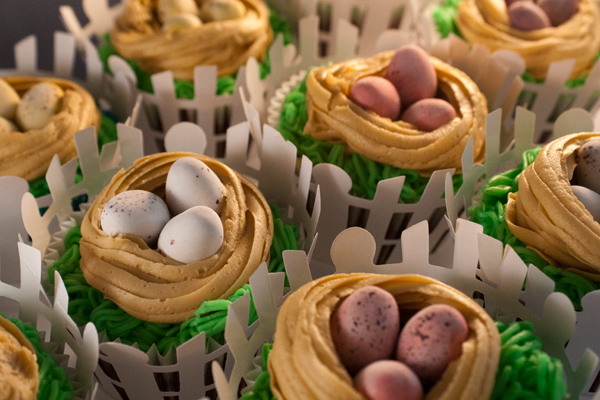
I’ve been wanting to try to make macarons for awhile but for some reason never rose to the challenge. So this weekend, I decided to finally give them a go, and they are honestly one of the most frustrating and difficult bakes you could do.

If the oven isn’t at just the right temperature, they won’t get their signature ‘foot’. If you don’t let them sit long enough to form their skin, they will crack. If you overmix the batter, they go flat. If you leave them in the oven for just 3 seconds too long, they turn brown. They’re affected by humidity and the ambient temperature of the room. Long story short, I made about 8 batches in total of these and only about half were actually useable. So if you want to give macarons a go, be sure you do it on a day when you don’t mind experimenting to find what temperature and things work best for you. Just don’t give up!!

Ingredients

  • 3 egg whites, room temperature
  • 3 Tablespoons sugar
  • 110 grams ground almonds, sifted
  • 175 grams icing sugar
  • 1 Tablespoon meringue powder
  • food coloring

Directions

1. Weigh out your ground almonds and icing sugar AFTER sifting, to make sure you don’t get any large granules into your mixture. You want to have the finest mixture you possibly can.  After weighing the two out, stick them in a food processer and give them a quick whiz to combine, creating a superfine powder. Set aside until you’re ready to mix.

2. In the bowl of your mixer fitted with the whisk attachment, place your egg whites and meringue powder. Whisk the eggs on high until they grow in volume and form soft peaks. At this stage, gradually add in your sugar while the mixer is still running. Just before the meringue reaches stiff peaks, add in your food coloring so that it gets mixed in evenly. You want to add a really concentrated, bright color as the color will fade when baking. It is crucial that you don’t overmix them.

3. Remove your bowl from the mixer; add in your ground almond and icing sugar mixture by sifting over the meringue, then gently folding it in with a spatula. Again, be careful not to overmix! Once all the dry ingredients are incorporated, press your mixture onto the side of the bowl to help reduce the volume a bit – but you don’t want it to go too runny, you should still be able to see a ‘ribbon’ sitting on top of your batter if you lift the spatula and drip some of the batter back into the bowl.

4. Transfer your batter to a large piping bag fitted with a plain 1/2-inch tip attached. Pipe your batter into 1 1/2- to 2- inch diameter circles on baking sheets lined with baking paper. You can freehand them or trace circles onto the underside of the paper so that you can have a guide to follow. Once all of your batter is piped, gently tap the trays on the countertop to help the macarons settle and remove air bubbles.

5. Let the macarons sit out to form a skin for at leas 30 minutes (I had to leave mine longer). Basically, the skin should be shiny and if you gently touch the top of a macaron, it shouldn’t feel sticky or come away on your finger.

6. Once the macarons have formed their skin, preheat your oven to 230°F (140°C). Place your macarons in to bake and set the timer for 10 minutes. Once they have formed their ‘feet’, turn the oven down slightly and bake for a further 8-10 minutes. This is where I had the most trouble, because I have a fan-assisted oven. The key is to sit there and watch them until you figure out the best temperatures and times for your macarons. Some of you may not need to reduce the temperature, others will. Just watch them so they don’t burn, because they will turn very quickly!

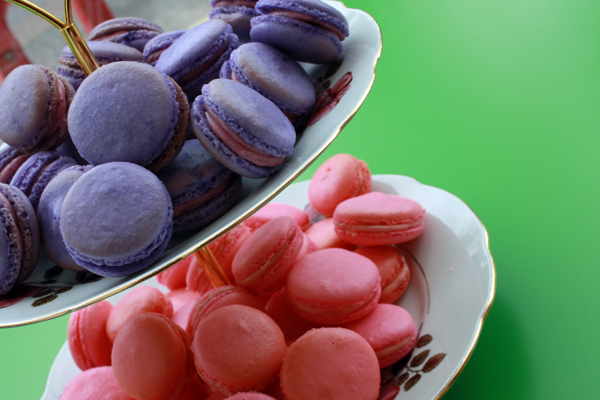
7. Once they’re finished baking, remove your macarons from the oven. Slide the baking paper off of your trays and allow the macarons to cool on your countertop. Once they’re cool, fill however you’d like – I used a standard buttercream that I flavored with strawberry jam for one batch, and a blueberry lime curd for the other. Just try experimenting with the flavors! These are best served fresh, so if you aren’t serving immediately, then wait on filling them so they don’t go soggy!

Advertisement

The Elvis Cupcake

ElvisCupcakes

We had a couple of bananas sitting in our fruit bowl this weekend that were looking pret-ty ripe. They were leftover from Ben’s last week of marathon training, as he ran the London Marathon last weekend!  So instead of baking last week, I was standing on the sidelines, cheering on thousands of runners as we waited for Ben to pass. He did really well and finished in 4:09:32, not bad for a first marathon!

IMG_6177_2


Back to the bananas…Their depressingly faded yellow peels covered in brown freckles were just begging to be put out of their misery. Instead of tossing them, I decided to make an old favorite: Elvis cupcakes.

Why Elvis? Because apparently the man loved peanut butter and banana sandwiches. Only these cakes take it a step further with a chocolate buttercream frosting. You may now be wondering where the peanut butter is if it isn’t in the frosting and the answer is the best surprise of this cake: a creamy peanut butter center!

While the flavor combination sounds like a strange amalgamation, you’d be amazed at how good these cakes taste!

Ingredients

For the cupcakes (makes 9):

  • 1 cup + 2 Tablespoons flour (preferably cake flour, if you have it)
  • 1/2 teaspoon baking soda
  • 1/4 teaspoon baking powder
  • 1/4 teaspoon salt
  • 1 whole overly ripe banana
  • 2 Tablespoons buttermilk
  • 1/2 teaspoon vanilla
  • 1/4 cup (58 grams) butter, softened
  • 1/2 cup + 2 Tablespoons + 1 1/4 teaspoons sugar
  • 1 egg

For the peanut butter filling:

  • 1/3 cup creamy peanut butter
  • 1 Tablespoon butter, softened
  • 3 1/2 Tablespoons icing sugar

For the chocolate buttercream:

  • 1/2 cup (115 grams) butter, softened
  • 1 Tablespoon milk
  • 3 ounces semisweet chocolate
  • 1/2 teaspoon vanilla
  • 5/8 cup icing sugar

Directions

1. Preheat oven to 350° F (approx 175°C). Place cupcake liners into the pan.

2. In a medium bowl, sift together the flour, baking powder, baking soda, and salt. In a smaller bowl, mix the vanilla and buttermilk.

3. In the bowl of your mixer, cream together the butter and sugar until light and fluffy, then beat in the egg. Once everything is incorporated, mash in the banana and mix well.

4. Stir in the sifted dry ingredients, alternating each addition with the buttermilk mixture. Make sure everything is blended in and smooth before adding the next addition. Once the batter is completely mixed, fill your prepared cupcake pans – filling each cup about 2/3 full.

5. Bake the cakes for about 17 minutes, or until a cake tester comes out clean. Rotate the pans halfway through the baking time. Once they are ready, let them cool in the pan for about 10 minutes before transferring to a wire rack to cool completely.

6. To make the peanut butter filling, beat the peanut butter and butter together until creamy.  Sift the icing sugar into the bowl and beat until light and fluffy, about 2 minutes.  Cut a hole into the top of each cupcake and spoon the filling into the hole, or using a piping bag with a filling tip (my method of choice).

7. To make the chocolate buttercream, melt the chocolate in the top of a double boiler until no clumps remain, and it’s completely smooth. Remove from the heat and allow to cool while you prepare the rest (about 5 – 10 min).

8. In medium sized bowl, beat butter for 3 minutes, until very very creamy.  Add the milk and beat until smooth.  Add the cooled melted chocolate and beat well. Add vanilla and whip for 3 more minutes.  Gradually add the sugar and beat until it’s nice and airy, then fill a piping bag and pipe onto the cakes.

Springtime Cupcakes

springcakes_03

It may be nearly a month late, but spring has finally come to London! Today was the first day that it’s gotten above 40°! In fact, it was nearly 70°! Ben and I had the balcony doors open to our flat and let the warm Southern breeze float through our living room – a welcome freshness to help air out an apartment that’s been hermetically sealed for the winter since October or November.

For some reason, it feels like winter lasts forever in the UK, but then one warm day and POOF! every single flower and tree is in full bloom and the grass is suddenly a bright shade of green as it soaks up the sunlight.

To welcome the season, here’s a simple cupcake that will bring the spring from outside in to your kitchen.

springcakes_01springcakes_02

Ingredients

For the cupcakes (makes 12):

  • 1/2 cup (115 grams) butter, softened
  • 1/2 cup (100 grams) sugar
  • 2 eggs, lightly beaten
  • 2/3 cup (100 grams) flour
  • 1 1/2 teaspoons baking powder
  • 1/3 teaspoon salt
  • 1/4 cup (30 grams) cocoa powder
For the frosting:
  • 6 Tablespoons (86 grams) butter, softened
  • 1 1/3 cups (160 grams) icing sugar
  • 1 Tablespoon milk
  • 1/2 teaspoon vanilla
  • 36 chocolate minieggs

springcakes_05

Directions

1. Preheat oven to 350° F (175°C). Place cupcake liners into the pan.

2. In the bowl of your mixer, cream together the butter and sugar until light and fluffy, about 3 minutes; then beat in the eggs one at a time.

3. Gently mix in the flour, baking powder, salt, and cocoa powder, being careful not to overmix.

4. Spoon the batter into your cupcake liners, then place in the oven to bake for 15 minutes. Be sure to keep an eye on them, as chocolate cupcakes have a tendency to dry out really quickly. Once they’re finished, allow them to cool in the pan for 10 minutes before transferring to a wire rack to cool completely.

5. To make the buttercream, place your butter into the bowl of your mixer, and beat it on medium-high speed until it’s light and fluffy. Then, lower your speed and gradually mix in the icing sugar. Beat until they are well mixed, then add in the milk and vanilla. Divide your batter by thirds, dying one third green and the other two thirds brown. Place each frosting color into a piping bag.

6. Fit the green piping bag with a grass-type decorating tip (it has a bunch of little holes in it). Roughly pipe the grass around the outer rim of your cake, lifting and releasing the pressure each time so that it breaks up into several ‘tufts’ of grass. Fit the brown pastry bag with a flower-type decorating tip. Use this bag to create your nests by swirling it around while leaving the middle hollow. Arrange three minieggs into each nest to finish.

springcakes_04

Bat Signal Cupcakes


Holy cupcakes, Batman!!

This weekend was Ben’s cousin Alex’s birthday and his girlfriend decided to throw him a Batman-themed surprise party. I volunteered to make a few special cakes to take along. I decided to evoke the theme by making the bat signal, and I used some cupcake liners with bats on them as well.

To make these, I made Guinness chocolate cupcakes for the cakes, and then a basic vanilla buttercream (using butter, vanilla, and icing sugar) and dyed it bright yellow. The frosting was piped on using a jumbo cupcake icing round tip: hold the piping bag straight at 90-degrees about 1/2 an inch away from the top of the center of the cake and hold it there while you pipe the icing on. It will fill out towards the edges on its own. When you’ve covered the desired amount of the top, reduce the pressure on your piping bag, dip it down a bit, then lift.

To make the bats, first draw out the bat shape multiple times onto a sheet of paper, then place this on a baking sheet and lay a sheet of baking paper over it. Tape down the edges of the baking paper so that it doesn’t shift when you are trying to trace the shapes.

Melt some chocolate (I used semisweet, as I had some on hand from a recent trip back to the States, but otherwise use dark chocolate) until it reaches a thick, but still liquid-like consistency that you can pipe with. Fill a piping bag fitted with a small circular decorating tip (like you’d use for writing) with the melted chocolate.

Quickly trace over your bat shapes with the chocolate, starting by outlining the shape then filling in. Once you’ve traced all of your bats, leave the chocolate to set. If you need it done faster, you can put them in the fridge, but you won’t get the same shine. I put these in the fridge because I actually wanted the chocolate to be a bit dull – it just seemed to fit with the matte black finish on The Dark Knight’s costume and cars.

I really loved the way these cakes turned out, especially since I did them on a bit of a whim. I was able to get a really great effect without a whole lot of extra effort – so I will definitely be using chocolate to decorate again!

Vanilla Vanilla Cupcakes

I may be a weekend baker, but during the week I do have a real job. “Design Strategist by day, crazy baker by night.” This year, the company I work for is celebrating their 20th anniversary and to celebrate the entire Chicago office flew over for a big party and some trans-Atlantic office team building. I wanted to add my own touch to the celebrations by baking some welcome cupcakes for the Chicago team – really it was just to give them a sugar boost as we had festivities planned for the evening and they had no time for jet lag!

I went to my trusty vanilla vanilla cupcakes recipe, I’ve had it for a few years now. I love this recipe because these cakes are full on flavour and because they’re vanilla and vanilla they’re very versatile! I’ve often dyed these cakes and frostings different colors, or add in sprinkles to the batter. Basically, this is a great recipe to play with.

This time, I went a bit overboard with the playfulness. Because our company uses white + different colors in our branding, I decided to incorporate a few of them by swirling together four different colors.

To do this, I used a bit of difficult, but still manageable tricks. For future attempts, I’d suggest only doing three.  I have two different sizes of piping bags as well as tips – the standard and then jumbo “cupcake” piping tips which are huge. I made a double batch of frosting, divided it  into four separate batches and dyed each batch a different color (white, blue, purple, and yellow). Then, I filled a standard piping bag with each color (so four bags total) and cut the tip of each bag. Then I used one of the jumbo cupcake piping tips and placed it in a large pastry piping bag (a big blue one). Once that one was set up, I gathered my four colored bags and dropped them into the jumbo pastry bag. (Ben was gracious enough to hold the bag open for me so I could drop them in.)

In hindsight, I probably should have taken pictures of this part. Anyways, to pipe, just hold the bag straight up and down and swirl, the colors should them swirl themselves!  The most difficult part at this point is just trying to hold the giant bag full of frosting!  If any of you are crazy enough to try this, make sure to send me pics of your results!

Ingredients

For the cupcakes:

  • 1 3/4 cups cake flour
  • 1 1/4 cups flour
  • 2 cups sugar
  • 1 Tablespoon baking powder
  • 3/4 teaspoon salt
  • 1 cup (230 grams) unsalted butter, softened and cut into cubes
  • 4 eggs, room temperature
  • 1 cup whole milk
  • 1 teaspoon vanilla
For the frosting:
  • 1 cup (230 grams) unsalted butter, softened
  • 4 cups icing sugar, sifted
  • 2 teaspoons vanilla
  • pinch of salt
  • 1/4 cup milk or heavy cream

Directions

1. Preheat oven to 325° F (approx 165°C). Place cupcake liners into the pan.

2. In the bowl of your mixer, sift together the flours, sugar, baking powder, and salt. Turn on the mixer to low speed, then slowly add in cubed butter. Mix until the butter is just coated with flour and you have a crumbly consistency.

3. In a small bowl, whisk together eggs, milk, and vanilla. Turn the mixer up to medium speed then add in the wet mixture in three parts, scraping down the sides of the bowl in between each addition. Mix until the ingredients are just incorporated; be careful not to over mix.

4. Fill each of the cupcake tins with a couple spoonfuls of the batter until they are filled just about 2/3 full.

5. Bake the cakes for 17-20 minutes, or until a cake tester comes out clean. Rotate the pans halfway through the baking time. Once they are ready, let them cool in the pan for about 5 minutes before transferring to a wire rack to cool completely.

6. To make the frosting, beat the butter in your mixer until it starts to become creamy. Then turn the mixer to low speed and gradually add in the sifted icing sugar.

7. When all of the sugar is mixed in, add in the vanilla, salt, and cream. Let mix on medium speed for five minutes or until it reaches the desired consistency.