Mary Berry’s Tiramisu

Tiramisu | pajamabaker.com

The Bake Off continues! This week, they made tiramisu, which is a fairly classic dessert but unfortunately I hate everything about it. I hate the taste of coffee. I don’t really like brandy-soaked sponge because it always seems soggy every time I eat it, and I have never understood why people would want to eat it!

But, keeping up with the challenges, I had to persevere. The real trick to this cake is to make sure you don’t over-beat the sponge so that it stays light and rises a lot. This will allow you to cut it in half more easily.  Also, take your time! Don’t try to rush it, as rushing will make you mess up and you won’t have the distinctive layers this cake needs.

I didn’t have the right sized tins that the recipe calls for, so I only have three layers rather than the four it’s supposed to have, and my tempered chocolate came out all brittle and spotty so I left them off the top – but it still turned out beautifully, and one of the girls at work said it was the best tiramisu she’s ever had – so I must have done something right!

Mary Berry’s recipe below!

Tiramisu | pajamabaker.com

Ingredients

For the sponge:
  • 4 eggs
  • 100 grams sugar
  • 100 grams self-raising flour
For the filling:
  • 1 Tablespoon instant coffee granules
  • 150 ml boiling water
  • 100 ml brandy
  • 3 x 250g tabs full-fat mascarpone cheese
  • 300 ml double cream
  • 3 Tablespoons icing sugar,sifted
  • 75 grams dark chocolate, grated
For the decoration:
  • 100 grams dark chocolate, chopped
  • 2 Tablespoons cocoa powder

Directions

1. Preheat your oven to 350ºF (175ºC). Grease a 15×10-inch Swiss roll tin and line it with baking paper.

2. First, make your sponge. In the bowl of your mixer, whisk together the eggs and sugar for 5 minutes until the mix is very pale and thick. Gently sift the flour over your mixture, and gently fold it in using a spatula until it just combines. Do not overmix or your sponge will not rise enough!

3. Carefully pour the batter into your prepared tin, making sure to keep it level. Bake for 20 minutes until golden. Let it cool in the tin for 5 minutes before gently turning it out onto a wire rack to cool completely.

4. To make the filling, dissolve your coffee in the boiling water, then add the brandy. Set aside to cool.

5. When your sponge is completely cool, carefully slice it in half to create two thin layers of equal height. Then using the base of a 7-inch square cake tin, cut out two squares from each layer so you have a total of four squares.

6. Line the base and sides of your square cake tin with baking paper, leaving enough hanging over the edges that you’ll be able to use them to help lift your cake out of the tin when it’s set.

7. Set your mixer up with a clean bowl and place the mascarpone cheese into the bowl. Beat in your cream and icing sugar to make a creamy frosting that you can spread easily.

8. Place one square of your sponge into the base of the tin, spoon over one quarter of your coffee and brandy mixture, then spread one quarter of the mascarpone filling over the soaked sponge.  Scatter the top with a third of the grated dark chocolate. Repeat this process to create your layers for the second and third sponge squares.

9. For the final layer, place the fourth sponge square on the top of the layers and spoon over the rest of the coffee and brandy mixture. Spread a very thin layer of the filling to create a “crumb coat” on the top of the cake, then spread the rest of the filling layer on top in a thicker layer. The crumb coat will help keep any of the sponge bits from appearing on the top of your cake. Place the cake in the refrigerator to chill for at least 1 hour.

10. While the cake is chilling, melt half of your dark chocolate in a double boiler until it reaches a temperature of 127ºF (53ºC). Then remove the bowl of melted chocolate from the heat and add the remaining half of your dark chocolate, stirring until it melts in and it is thick enough to put into a piping bag. Once it’s in your bag, snip off a small corner and pipe to chocolate to make decorative shapes for the top of your cake. Leave the chocolate to set until you need it.

11. Dust the chilled tiramisu with the cocoa powder before you transfer it to your serving plate, using the baking paper to help you lift it out of the tin. Then place your chocolate decorative shapes on top, et voila!

Tiramisu | pajamabaker.com

Ciabatta Bread

Ciabatta | pajamabaker.com

This week’s technical challenge was the ciabatta loaf. When Paul said to the contestants “be patient” – he wasn’t kidding. This dough takes forever to rise and it’s an investment in time to bake. Frustratingly, the contestants on Great British Bake Off were challenged to make these loaves in an afternoon. So I was a bit surprised when I went to the official Paul Hollywood recipe they posted only to find that this was going to be an all day (overnight in fact!) project…

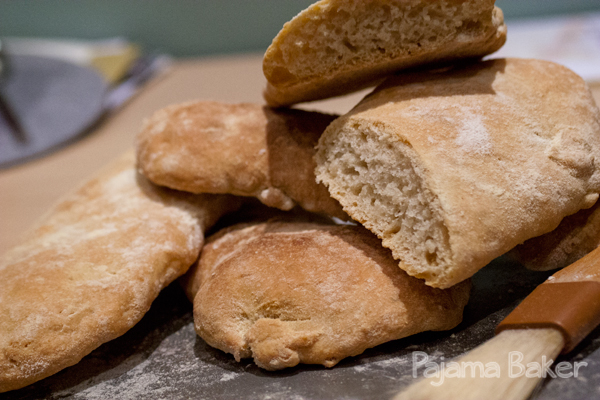
My loaves turned out a little flatter than I would have liked, but that may be due to my handling the dough a little too much, but I was successful in getting the uneven air holes in the final bakes (a characteristic of good ciabatta!). One of my loaves even surprised me with a heart inside! Ben ended up using these to make paninis for lunch this week, so they definitely were put to good use!

Ingredients

For the starter dough:

  • 250 grams bread flour
  • 190 ml water
  • 15 grams yeast
For finishing the loaves:
  • 250 grams bread flour
  • 10 grams yeast
  • 190 ml water
  • 12 grams salt

Directions

1. The night before you want to bake your loaves, make the starter dough. Mix the flour and water in a large bowl, then add the yeast. Whisk for three minutes and leave to rise overnight (or at least eight hours).

2. The next day, add the remaining flour and yeast to the bread mixture and mix well. Then add in the water and salt to form, mixing for about five minutes until it forms a wet, sticky dough.

3. Transfer your dough to a large oiled square container and leave it to rise for at least one hour, or until it doubles in size.

Ciabatta heart | pajamabaker.com

4. Quickly flip the container upside down onto a heavily floured work surface to turn out your dough. Leave it to rest for another 30 minutes. In the meantime, preheat your oven to 465ºF (240ºC).

5. Cut the dough into 3 long strips and gently shape them into ciabatta loaf shapes.  The dough is really sticky and runny, so this can be a bit tricky. Just don’t overwork the dough, or you’ll lose all your lovely air bubbles inside and the loaves will turn out really flat.

Ciabatta heart | pajamabaker.com

6. Place your loaves onto a baking sheet lined with baking paper, then leave them to rest for 10 minutes. This will help the dough to get that last bit of rising in before baking, hopefully helping to make up for any air lost while handling the dough.

7. Bake your loaves for 25 minutes until golden, then immediately transfer them to a wire rack to cool.

Ciabatta heart | pajamabaker.com

Mary Berry’s Florentines


florentines04 florentines07This week was biscuit week on Great British Bake Off and the technical challenge that the bakers had to complete were Mary Berry’s florentines.  Now, to help clarify, in the UK, biscuits aren’t simply synonymous with cookies. Biscuits tend to be a bit crispy or crunchy, whereas a cookie tends to be softer and chewier, especially in the center. It gets extra confusing when they make savory biscuits (with cheese and stuff in them), because in my head, those are crackers. Cookies are sweet and they certainly don’t have cheese in them!  Oh well, another one of those epicurean curiosities of living in another country.

I decided to continue in my theme this season and follow along with all of the technical challenges, so I looked up Mary’s recipe that was used for the show to give these nutty, fruity, crunchy biscuits a go.  They were a bit trickier than last week’s cherry cake, but that’s because you have to be very precise when measuring them out so that they’re all equal. And even then, a couple of mine spread unevenly.


Ingredients

  • 50 grams butter
  • 50 grams demerara sugar (this is brown, unprocessed granulated sugar, sometimes called raw sugar in the States.)
  • 50 grams golden syrup (this is a sort of maple-syrup type thing, but lighter. You could substitute a really thick honey for a similar flavor.)
  • 50 grams flour
  • 25 grams dried cranberries or glacé cherries, finely chopped
  • 50 grams candied peel, finel chopped
  • 25 grams almonds, finely chopped
  • 25 grams walnut pieces, finely chopped
  • 200 grams plain chocolate, chopped into chunks

florentines01Directions

1. First, preheat your oven to 350° F (175°C). Line a few baking trays with baking paper, and set aside.

2. In a small pan over low heat, add the butter, sugar, and golden syrup. Heat gently until the butter melts. Once melted, remove the pan from the heat and add in the rest of your ingredients (except the chocolate!). It’ll form into a sticky, gooey mixture.

3. Now this is where it gets a bit tricky. You need to divide the dough into 18 biscuits. In theory, you could just add up all the weights and divide by 18 (so 18 grams each), but nope! Because the mixture is so sticky, you’re bound to lose a bit of weight to bits getting stuck to your hands or spoon or everything. So I measured mine out to be between 15 and 16 grams each to be sure I had that covered. Place each of your 18 dough balls evenly across your prepared baking sheets, making sure there’s plenty of room for them to spread.

florentines09

florentines08

4. Bake for 8-10 minutes, until they turn a dark, golden brown around the edges. Remove them from the oven to cool, then carefully move them to a wire rack for the next stage. To quote Mary, the should have a “nice lacy texture” to them, with the edges uneven and you should be able to see through them a bit.

5. Temper your chocolate by heating half of it in a heatproof bowl over a pan of water on medium heat. Once it’s melted, remove the bowl from the heat and add in the rest of the chocolate. This should make your chocolate nice and shiny when it sets.

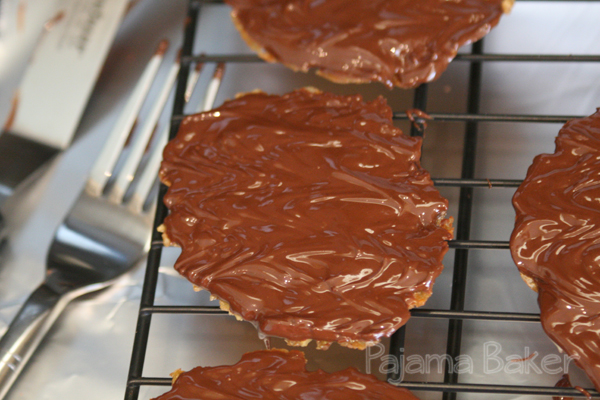
florentines02florentines066. Using a palette knife, or offset spatula, gently coat the underside of your biscuit with the chocolate, and then place it upside down on a wire rack to set. Once the chocolate begins to set up, drag a fork back and forth through the chocolate to create the “signature zig zag” look. Then allow the chocolate to cool and set completely.

florentines03


That’s it! Job done! I’m pretty sure my florentines would have landed me in the Top 5 for the technical challenge. 😉florentines05

Mary Berry’s Cherry Cake


Cherry Cake | pajamabaker.com

You know how every Christmas there’s that song that plays touting December as the most wonderful time of the year? As much as I love Christmas, every summer about this time that song starts creeping into my head. Not because I’m anticipating the steadily approaching holidays, but because one of my favorite TV shows returns: The Great British Bake Off.  This year, for Series 5, they’ve actually moved the show to BBC One, which means a lot more exposure, and a lot more excitement!

In the first year I started this blog, I challenged myself to try one bake from each of the episodes in order to grow my skills and try my hand at some of the challenges in hopes of auditioning for GBBO.  It worked well then, (I got as far as the audition round) so I figured I’d give it another shot. Plus, it’s more motivation to keep baking each weekend (as if planning an international wedding wasn’t enough to keep me busy! Only 61 days to go!).

The first episode of the show focused on cakes, a relatively simple category, but it really allowed us to focus on meeting the new bakers this year. There are a few that I think have amazing talent, but one of them drives me absolutely up the wall! He is the most obnoxious person I could imagine meeting. I’m hoping he gets kicked off soon! Fingers crossed! The technical challenge for the episode was to make Mary Berry’s Cherry Cake, an almond-flavoured sponge with bits of cherries distributed throughout the cake.

The trick to putting the cherries in is to chop them into smaller pieces, then rinse, dry, and coat with flour. This helps the cherries “float” in the batter so that they don’t all sink to the bottom of the tin (eventually the top of your cake). This cake was super easy to make, although it didn’t rise as much as I would have expected, so I may double the recipe next time so that it makes more of a statement on the plate!

Cherry Cake | pajamabaker.com

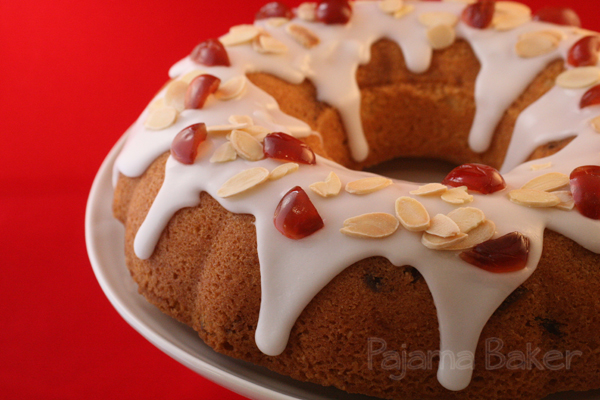
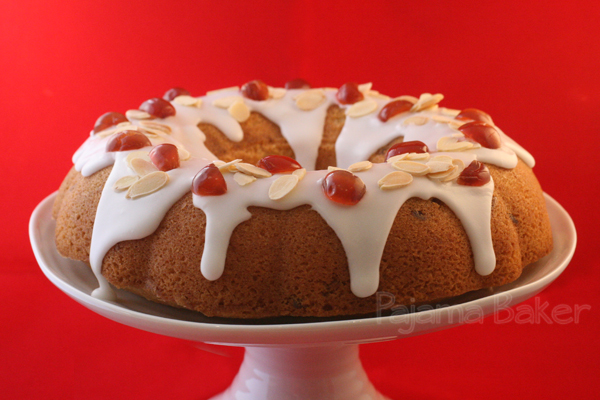
Now before you start wondering about the crooked-looking cake, it’s actually my new cake stand, which was given to me as a bridal shower gift by one of my bridesmaids, Kelsie. It’s absolutely beautiful and I love that it has that quirky, not exactly perfect appearance. It just adds to the handmade nature of what’s being presented on it. After getting this stand, I found out they do it in two other sizes and heights, so I’m definitely adding those to my wishlist!

Cherry Cake | pajamabaker.com


Ingredients

For the cake:

  • 200 grams glacé cherries (or maraschino cherries if you’re in the States)
  • 225 grams self-raising flour (minus 2 Tablespoons, which you’ll use for the cherries)
  • 175 grams butter, softened
  • 175 grams sugar
  • the finely grated zest from 1 lemon
  • 50 grams ground almonds
  • 3 large eggs
For the icing:
  • 175 grams icing sugar
  • the juice from one lemon
  • 15 grams flaked almonds, toasted
  • 5 glacé cherries, cut into quarters (you can take these from the 200 grams used for the cake)

Directions

1. Preheat oven to 350° F (approx 175°C). Grease a bundt pan and set aside.

2. Cut all of your cherries into quarters, then rinse them under cold water so they aren’t sticky and turn them out onto some paper towels to dry. Make sure you set aside 5 of your cherries for the topping. Toss the rest of the cherries in your 2 Tablespoons of flour so that they’re evenly coated.

3. In your mixer, cream the butter and sugar until light and fluffy, then add in your eggs one at a time. Once mixed, add in your flour and ground almonds and mix in thoroughly. Remove your bowl from your mixer and fold in your flour-coated cherries and lemon zest by hand.

4. Pour your batter into you greased pan and bake for 35-40 minutes, until your cake tester comes out clean and the top is a lovely golden color. Let your cake cool in the pan for 10 minutes, then turn it out onto a wire rack to cool completely.

5. To make your icing, gradually add the lemon juice to your icing sugar so that it makes a thick paste. Carefully drip the icing over the top of the cake using a spoon. You want the icing to run down the sides a bit, but not completely coat the cake, so you’ll need it to be pretty thick.

6. Finally, top your cake with the toasted flaked almonds and your cherry bits.

That’s it! Easy peasy! (And Ben says it’s delicious!)

Cherry Cake | pajamabaker.com

Chocolate Gingerbread Cake

GingerbreadCake_3

So I hadn’t mentioned this earlier, but I sent in an application for the next series of the Great British Bake Off. One day, I received a very interesting phone call – one of the people who works on the show; he asked me a few questions and then asked if I would like to come in for an in-person interview for the next round of auditions. Of course, I said yes!!

I don’t know how I managed to stay so calm during my interview, I’m pretty sure I was speaking a mile a minute and I felt like my heart was going to burst out of my chest. As soon as I got off the phone, I ran back upstairs to my desk at work with a grin bigger than the Cheshire Cat’s. I was going to audition. I had been selected out of thousands of applicants to have a chance to prove my baking skills.

I was given the instructions to bring some examples of my baking to show off my skills, and instantly my mind starting spinning – what should I make? I wanted something that would be a showstopper. Something that would represent me and my American-ness. Me and my Southern-ness. So I instantly thought to a recipe from Southern Living that I had been eyeing for some time – a chocolate gingerbread cake.

The following weekend, I did a trial bake to take to work for feedback. After a few suggestions and a bit of tweaking, I think I nailed my final recipe. I ended up making this cake three times – once for work as a trial, once for the audition, and a third time for Christmas Eve dinner to share with my family (who are probably more excited at my prospect than I am, as they immediately started planning out plot lines and how they’d ‘spin’ my story on the show).

Anyways, this cake does take a bit of time to prep and assemble. But it is worth it – it is so moist and delicious and it just looks and tastes like the holidays. Plus, the chocolate ganache and toffee layers in between the cakes are an extra decadent treat. The key is to take your time and try not to rush through.

As far as Bake Off goes, I’m awaiting the results to see if I’m invited to the next round – but hopefully this cake impressed! So, bakers, keep your fingers crossed!

Ingredients

For the cake:

  • 1 1/2 cups dark chocolate, chopped
  • 1 16-ounce package (450 grams) light brown sugar
  • 1/2 cup (115 grams) unsalted butter
  • 3 eggs
  • 2 cups (330 grams) flour
  • 3/4 teaspoon ginger
  • 1 teaspoon cinnamon
  • 1/2 teaspoon salt
  • 3/4 teaspoon allspice
  • 1/4 teaspoon nutmeg
  • 1 10-ounce (300 ml) container sour cream
  • 1 cup hot water
  • 1/4 cup black treacle or 1/2 cup molasses
  • 1 teaspoon baking soda
  • 2 teaspoons vanilla
For the chocolate ganache:
  • 2 cups dark chocolate
  • 1/4 teaspoon salt
  • 1 14-ounce can sweetened condensed milk
  • 2 Tablespoons (28 grams) butter
  • 1 teaspoon vanilla
  • 2 Tablespoons heavy cream
For the toffee layer:
  • 400 grams dairy toffee pieces
  • 1/4 cup (57.5 grams) butter
  • milk, if needed
For the ginger whipped cream:
  • 2 cups heavy cream
  • 5-6 1/8-inch slices peeled fresh ginger
  • 6 Tablespoons icing sugar
For decorating:

Directions

1. The night before you want to bake your cake, prepare the ginger whipped cream. In a small saucepan over medium-high heat, cook the cream and ginger for 3-5 minutes of just until bubbles appear. Be sure not to let the mixture boil. Remove from the heat and let cool to room temperature. Once cool, place in a container to chill in the fridge for at least 4 hours, but overnight would be best. The colder your cream, the better it will whip!

2. When you’re ready to bake your cake, preheat your oven to 350°F (175°C). Butter and line 3 round cake tins with parchment paper, then butter the parchment paper. Next, begin your cake batter microwaving your chocolate in a bowl in 30-second bursts until melted. Be sure to stir the chocolate in between bursts to make sure it doesn’t burn!

3. In the bowl of your electric mixer, beat the brown sugar and butter at medium speed until well blended. Add eggs one at a time, followed by the melted chocolate, beating until it’s just blended.

4. Sift together the flour, ginger, cinnamon, salt, allspice, and nutmeg. Gradually add this flour mixture to the chocolate mixture, alternating with the sour cream. Make sure to begin and end your additions with the flour mixture. Beat at a low speed until everything just comes together. Next, stir together the hot water with the black treacle/molasses as well as the baking soda (this mix will foam a bit). Gradually stir the molasses mixture into the rest of the batter, as well as adding in the vanilla. Once your mixture is blended together, spoon the batter evenly into your 3 prepared cake tins.

5. Bake the cakes for 25-30 minutes, or until a cake tester comes out clean. Cool the cakes in the pans on a wire rack for 10 minutes before turning out to cool completely (about an hour).

6. When the cakes are nearly cool, prepare your toffee mixture. In a glass bowl over simmering water, place your toffee pieces and butter together. Gently heat until the butter and candy begins to melt and become runny. You’ll need this to have a fairly runny consistency in order to spread over your cake. If you need to, you can add more butter or a bit of milk to help lighten the consistency. Once the toffee is melted, quickly spread a layer over the top of two of your cakes. Be careful not to work it too hard as it cools, because it can tear your cakes.

GingerbreadCake_2

7. Next, make your chocolate ganache. Similar to the toffee, melt your chocolate pieces and salt in a bowl over simmering water. Once everything is melted, add in the sweetened condensed milk; cook for 1-2 minutes, stirring constantly until everything is smooth. Remove from the heat, then add in the butter and vanilla, stirring for 4-5 minutes until smooth. Let the ganache cool to room temperature before transferring to another bowl. Add in the cream and beat with a hand mixer on high speed until it reaches the consistency of buttercream. If you need to, you can add a bit of icing sugar to help with the consistency. Once it’s ready, spread the ganache over your toffee layers.

8. Once all of your cakes are toffee-d and ganache-d, layer them up so that the cake with nothing on it is the top layer. Then whip up your chilled ginger cream to make the frosting. Pour the cream through a fine mesh strainer to remove the ginger pieces. Beat with a hand mixer on high speed until the mixture starts to foam. Then add in your icing sugar and continue to mix on high speed until stiff peaks form. Use the whipped cream immediately and spread over your cake.

9. Finally, decorate your cake however you’d like using fresh gingerbread cookies, mint, and cranberries.