Sweet Tea and Lemonade Cake

IMG_4285_sm


It has been incredibly warm this summer in London. And when you live in a house built in the 1930s that doesn’t have any air conditioning, it makes things heat up pretty quickly. It also makes icing cakes really difficult (as you can see from my terribly runny cake in the picture). But as hot as it gets outside and on the Tube, my office is an absolute icebox and I’m constantly cold – meaning I’m constantly wearing jackets and cardigans. While the Brits might give me awkward looks, it’s still pretty comfortable.

Growing up in Virginia, the summers easily got to be well over 90 or 100 degrees for days on end. Add the humidity to that, and you’re pretty much melting. The plus side? I’ve got a pretty high tolerance for summer heat. So I can get away with wearing a couple light layers while the rest of England starts stripping off as much as decently possible.

As promised, I’ve gotten into baking again, but the interesting bit is that I’m also on a very strict diet pre-wedding (skinny bride! skinny bride!) – so I can’t actually eat any of it. Thank goodness for work colleagues and a fiancé with a seemingly bottomless stomach!

This week’s bake comes from the latest issue of Southern Living magazine, and despite the melty frosting, it went down really well and was pretty simple!  Their recipe called to do it in a single-layer 13 x 9-inch pan, but I did mine in two 8-inch square pans and I think it just helped make it a bit more of a treat, but I’ve put the timings for both!


Ingredients

For the cake:

  • shortening (for greasing the pans)
  • 1 1/2 cups boiling water (about 1/4 litre)
  • 6 standard (or 3 family-size) teabags (I used English Breakfast)
  • 1 cup (226 grams) butter, softened
  • 2 cups (400 grams) sugar
  • 1/2 cup (85 grams) packed light brown sugar
  • 5 large eggs, room temperature
  • 3 1/2 cups (550 grams) flour
  • 2 teaspoons baking powder
  • 3/4 teaspoon salt
  • 1/4 teaspoon baking soda
For the frosting:
  • 1 (8-oz) package of cream cheese, softened
  • 1/4 cup (57.5 grams) butter, softened
  • 6 cups (about 500 grams) icing sugar
  • 1 Tablespoon fresh lemon zest
  • 3 Tablespoons fresh lemon juice

Directions

1. Preheat oven to 350° F (approx 175°C). Grease and flour your pans.

2. Pour your boiling water over the tea bags in a large glass bowl (or Pyrex jug) and let them steep for 10 minutes. After that time, remove the tea bags, squeezing the liquid out, and let the brewed tea cool for at least 20 minutes.

3. In your mixer, cream the butter and slowly add in the sugar until everything gets light and fluffy. Add your eggs 1 at a time, beating until just blended after each addition.

4. In a large bowl, mix together your flour, baking powder, salt, and baking soda. Alternate adding this mixture to your butter mixture with 1 cup of the cooled tea, making sure to begin and end with the flour mixture. Discard the remaining 1/2 cup of tea. Pour batter into your prepared pans, if using more than one pan, make sure you get them even!

5. If using a 13 x 9, bake for 35-40 minutes. If using 2 8-inch pans, I baked mine for 25 minutes, rotating the pans halfway through. Either way, your cake is done when your cake tester comes out clean and springs back a bit when you lightly touch it. If doing a layerd cake, remove from the oven and let cool in the pan for 10 minutes before turning out onto a wire rack to cool completely. If doing the 13 x 9, let the cake cool completely in the pan.

6. To make the frosting, beat the butter and cream cheese in your mixer until it starts to become creamy. Gradually add in your icing sugar, beating at low speed to help reduce giant messy sugar clouds. I find covering the mixer with a damp tea towel helps reduce it a bit. Once all your icing sugar is in, beat in the lemon zest and juice – then crank your mixer up to high and beat until the frosting is light and fluffy.

To decorate my cake, I used really thin lemon slices. However, they tended to leak some juice out – so you may want to set these out on a paper towel to dry out a bit so that there isn’t as much juice.

Hummingbird Cake

HummingbirdCake_LR

I’ve always seen recipes for hummingbird cake, but have never quite figured out exactly what it actually is. A cake with bananas, pecans, pineapple – surely it just seems bizarre! Like it’ll just be a big lumpy mess of cake! I never really understood the appeal, but decided to give it a shot after I saw this recipe on the cover of Southern Living.

This cake in particular has a cream cheese custard filling and what’s supposed to be browned butter frosting. But I chickened out in the middle of browning my butter – I didn’t want it to burn!

Despite my skepticism, this cake turned out pretty well! It was a big hit at work, so there must be something magical about the strange combination of ingredients.

Ingredients

For the cake:

  • 3 cups flour
  • 2 cups sugar
  • 1 teaspoon baking soda
  • 1 teaspoon salt
  • 1 teaspoon cinnamon
  • 2 cups chopped overripe bananas (about 3 medium bananans)
  • 3 eggs
  • 1 cup chopped toasted pecans
  • 1 cup vegetable oil
  • 1 8-ounce can crushed pineapple, undrained
  • 2 teaspoons vanilla
For the cream cheese custard filling:
  • 3/4 cup sugar
  • 1/3 cup flour
  • 3 eggs
  • 1 1/2 cups milk
  • 1 8-ounce package of cream cheese, softened
  • 1 Tablespoon vanilla
For the browned butter frosting:
  • 1 cup (230 grams) butter
  • 16 ounces icing sugar
  • 1/4 cup milk
  • 1 teaspoon vanilla

Directions

1. The night before, make your cream cheese filling. Whisk together first 2 ingredients in a heavy saucepan, then whisk in eggs and milk until smooth. Cook over medium heat, whisking constantly, 8 to 10 minutes or until mixture reaches a chilled pudding-like thickness. Bring to a boil, whisking constantly, and allow to boil for 1 minute. Remove from heat, and whisk in cream cheese and vanilla until cheese melts. Cool to room temperature (about 1 hour). Place plastic wrap directly on mixture (to prevent a film from forming), and chill 6 to 24 hours.

2. The next day, make your cake.Prepare 4 9-inch round cake tins by greasing and lining the bottom with baking paper. Preheat your oven to 350°F (175°C). Mix all of your dry ingredients together, then add in the rest of the ingredients to create a moist batter.

3. Bake for 20-25 minutes or until your cake tester comes out clean. Remove from the oven and allow to cool on a wire rack for 10 minutes, then remove the layers from their pans and allow them to cool completely. 

4. Put together your cake layers by spreading a portion of the cream cheese custard in between each layer. Cover your cake with plastic wrap and place in the fridge to cool while you make your frosting. 

5. Finally, make your frosting. Cook butter in a small heavy saucepan over medium heat, stirring constantly, 8 to 10 minutes or until butter begins to turn golden brown. (This is the part where I chickened out!) Remove pan immediately from heat, and pour butter into a small bowl. Cover and chill 1 hour or until butter is cool and begins to solidify.

6. Beat butter at medium speed with an electric mixer until fluffy; gradually add sugar alternately with milk, beginning and ending with sugar. Beat at low speed until well blended after each addition. Stir in vanilla.

7. Once your frosting is finished, frost your cake.

The frosting on my cake is called a basketweave. To do this, you’ll need A LOT of frosting, so you’ll want to double the recipe to make sure you have plenty to get the job done!

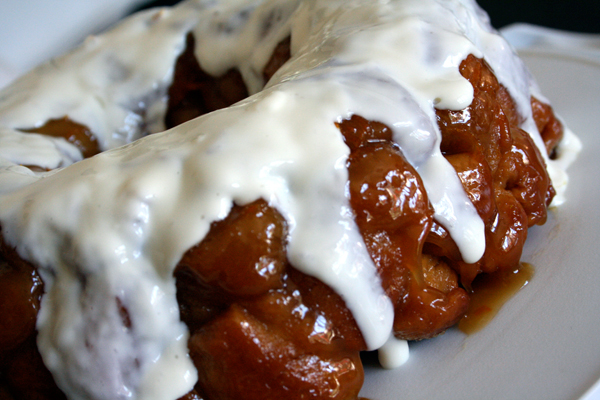
Orange Vanilla Monkey Bread

MonkeyBread2

Last week was my birthday, and Ben took me out for a day in London followed by dinner and drinks at a retro bowling alley with friends. Along with lots of cards from friends and family, I also received a surprise birthday package from my Aunt containing this:

Monkey


HOW ADORABLE IS HE?!?!?! I literally could not stop playing with him for at least an hour, posing him around the house to find a perfect spot for him to perch before finally deciding to put him in our pie dish (next to my bagels to take to work for lunch) so that he can watch as we cook. I don’t know what I love more about him, his little hat and slippers, or the fact he’s clutching a wooden spoon. Either way, he was a fantastic gift!

In honor of our newest houseguest, I decided to make an old family favorite: monkey bread. Except when I was looking for a recipe, I came across one from The Pioneer Woman, who I swear has some of the best recipes for everything. Given that I’ve used a lot of her recipes for dinners, I knew I couldn’t go wrong with her twist on sharing favorite: orange and vanilla.

I added my own little touch by making a quick cream cheese glaze to to drizzle over the top. Normally you make monkey bread with pre-packaged biscuit dough, but you can’t get that here in the UK; so I made up a quick basic dough to chop up and use instead and it was just as tasty.

This bread is great for a brunch, as you can put it in the center of the table and let everyone pick away at all the little bits. Just be sure to have plenty of napkins on hand for sticky fingers!

Ingredients

For the bread:

  • 3 tubes refrigerated biscuit dough
  • 1 cup sugar
  • 2 oranges, zested
  • a pinch of salt
  • 1 cup (230 grams) salted butter
  • 3/4 cup brown sugar
  • 1 Tablespoon vanilla
For the cream cheese glaze:
  • 1 8-ounce package cream cheese, softened
  • 3 Tablespoons icing sugar
  • milk, if needed

MonkeyBread

Directions

1. Preheat oven to 350° F (approx 175°C).

2. First, chop up all of your biscuit dough into small, bite-sized pieces. In a large zip-top bag, mix the sugar, salt, and orange zest; once they’re all mixed together, add in your biscuit dough pieces, seal it up, and give it a good shake to coat everything. Dump all of the biscuit pieces into a bundt pan and set aside.

3. In a pan over medium heat, melt the butter. Stir in the brown sugar and vanilla, stirring until they’re all combined. Don’t let the sugar mixture start to boil though! Once they’re mixed, pour the goo on top of all your biscuit pieces in the pan. Give the pan a bit of a shake to help everything settle.

4. Place the pan in the oven and bake for about 25 minutes, until the tops of the biscuits start to turn a golden brown. Remove from the oven and allow to cool in the pan for 10 minutes. Do not let it rest any longer or it’ll stick in the pan!  After the 10 minutes, turn it out onto your serving plate.

5. While the bread is baking, beat the cream cheese in your mixer on a medium-high speed until it becomes super creamy. Gradually add in your icing sugar, and dilute with a bit of milk until you get a sort of runny consistency. Basically, you want it to be able to drip it onto the top of the cake and only drizzle down the sides a bit – so you shouldn’t need to add too much milk. Remember, your hot bread will cause it to melt and become even runnier!

6. After turning the bread out of your bundt pan, let it sit for about 5 minutes before drizzling on the cream cheese glaze.

Pumpkin Cupcakes


Ask anyone who knew me growing up and they’ll tell you – Halloween is my favorite holiday. I used to go overboard making my own costume every year, determined to have the best one out of everybody. It’s a shame that Halloween isn’t really a “thing” here in the UK – it actually made me a bit sad not dressing up, carving a jack-o-lantern, or going to Halloween parties, pumpkin patches, or haunted hay rides. *note to self – must throw a Halloween party some year.

And fall is pretty much my favorite season from a culinary perspective. It marks the beginning of the best cooking and baking season that leads up to Christmas. One of the best seasonal ingredients is pumpkin. Cooking with pumpkin just instantly signals fall – so I special-ordered a few cans of pumpkin to load up for a few rounds of pumpkin baking.

As a Halloween treat to my co-workers, I decided this week to throw together a batch of pumpkin cupcakes with cream cheese frosting. As I was baking these on a weeknight and ended up staying up pretty late, I completely forgot to take photos. Luckily I had a photo from another time I baked these a few years ago. So while I apologize for the poor-quality photo, I will not apologize for the presence of Jack Skellington.

If anything, he just adds a bit of the Halloween spirit.


Ingredients

For the cupcakes (makes 24):

  • 2 1/4 cups flour, sifted
  • 1 Tablespoon baking powder
  • 1/2 teaspoon baking soda
  • 1/2 teaspoon salt
  • 1 1/2 teaspoons cinnamon
  • 3/4 teaspoon ground ginger
  • 1 teaspoon nutmeg
  • 1/2 cup (115 grams) butter
  • 2 eggs, beaten
  • 1 cup canned pumpkin (or cooked and mashed up)
  • 3/4 cup milk
For the frosting:
  • 1/4 cup (57.5 grams) butter, softened
  • 1 8-ounce package cream cheese, softened
  • 1 pound (1 box, about 4 cups) icing sugar, sifted
  • 2 teaspoons vanilla

Directions

1. Preheat oven to 375° F (approx 190°C). Place cupcake liners into the pan.

2. In a large bowl, sift together the flour, baking powder, baking soda, salt, ginger, cinnamon, and nutmeg.

3. In the bowl of your mixer, cream together the butter and sugar until light and fluffy, then beat in the eggs. Once everything is incorporated, add in the pumpkin.

4. Stir in the sifted dry ingredients, alternating each addition with the milk. Make sure everything is blended in and smooth before adding the next addition. If you’d like, you can also add in some chopped walnuts or pecans at this stage. Once the batter is completely mixed, fill your prepared cupcake pans – filling each cup about 2/3 full.

5. Bake the cakes for about 25 minutes, or until a cake tester comes out clean. Rotate the pans halfway through the baking time. Once they are ready, let them cool in the pan for about 5 minutes before transferring to a wire rack to cool completely.

6. To make the frosting, beat the butter and cream cheese in your mixer until it starts to become creamy. Then turn the mixer to low speed and gradually add in the sifted icing sugar. Finally, add in the vanilla and mix until it is completely blended. The consistency of this frosting is best spread on with a spatula, rather than piped. If you’d like a stiffer frosting, then add more sugar.

Peanut Butter Cheesecake Brownies

It’s been a busy couple of weeks, and after missing baking last weekend, I was really looking forward to getting back in the kitchen today.

Last week, Ben and I went to the (hopefully) final wedding of the year. Three within about three month is quite a lot, considering Ben was best man in two of them! It was a wonderful weekend in Dorset, where we stayed in a B&B in a village called Shitterton (I kid you not). I think one of the best parts of the wedding day was the wedding cake. The couple, whose last name is Cheesman, decided to go with a stack of different kinds of British cheeses as their tiered wedding cake. It was such a great idea! They had real wedding cake as well, but it wasn’t the focal point. Needless to say, I tried quite a few types – including one wrapped in nettles!

This week was Independence Day in the US, but while my friends and family back home were celebrating by lounging poolside and having massive cookouts, I was busy running my first-ever 5K along with some of the other ladies from the office after a long day at work. It was for a great cause though, and gave me a bit of a boost in wanting to get back in shape! And while there were no beers, hot dogs, or fireworks, it was a great day!

Originally I wanted to bake something to celebrate Americana in honor of the 4th, but then I do that just about every time I bake. So instead, I decided to celebrate my personal achievement by making something with my all-time favorite flavor combination: peanut butter and chocolate. I figured I’d then squeeze in the Americana bit by making it in brownie form.

So off I went to find a recipe, but surprisingly not that many recipes came up! I found plenty of cheesecake brownies, and other flavor brownies, but the only one I came across for peanut butter and chocolate used a box-mix for the brownie batter. And while I have no problems with a good Betty Crocker box mix, I’m determined to make everything for my blog by scratch. It was time to experiment.

This recipe comes from combining two other recipes and making a few adjustments. What came out was a rich, decadent brownie that just begs to be eaten with a tall glass of cold milk. My only caveat was that I wish I had swirled in the cheesecake batter a bit deeper, as the brownie batter rose quite a lot – but otherwise I’m happy.

Ingredients

For the brownie mixture:

  • 200 grams dark chocolate, chopped
  • a bit over 1 cup (250 grams) butter
  • 1 3/4 cup (300 grams) brown sugar
  • 4 eggs, lightly beaten
  • 1 1/3 cup (200 grams) flour
  • 1/4 teaspoon baking powder
  • 1/3 cup (30 grams) cocoa powder
  • 1/4 teaspoon salt
  • 1/4 cup milk (or buttermilk)
For the cheesecake mixture:
  • 1 8-ounce package of cream cheese, just barely softened
  • 1/3 cup sugar
  • 2 Tablespoons icing sugar
  • 1 egg, lightly beaten
  • 1/2 cup, plus 1 Tablespoon smooth peanut butter
  • 1/2 teaspoon vanilla
  • 1/2 teaspoon salt
  • 2 Tablespoons milk

Directions

1. Preheat oven to 350° F (approx 175°C). Butter two glass 8×6-inch baking dishes, line with baking paper and grease the baking paper as well.

2. First make the brownie mixture. In a heat-proof bowl over simmering water, place the chopped chocolate and butter and gently mix until everything melts and the mixture is smooth.

3. In a large bowl, whisk together the melted chocolate, eggs, and sugar until combined. Then add in the flour, cocoa powder, baking powder, and salt. Whisk until smooth then distribute the batter evenly between your two prepared dishes.

4. Next make the cheesecake mixture. Beat together the cream cheese, eggs, and both types of sugar using an electric mixture. Add in the peanut butter, then add in the milk as needed to make the mixture smooth, but still thick. Finally, add in the vanilla and salt and stir to combine.

5. Drop spoonfuls of the cheesecake mixture over the brownie batter,and use a butter knife to swirl it into the batter.

6. Bake the brownies for approximately 40 minutes, until the center is set. Remove from the oven and allow to cool in the pan for 15 minutes. Remove from the pan by lifting the baking paper and transfer to a wire rack to cool completely before slicing.