Peanut Butter Cup Brownie Cake

chocolatepeanutbuttercake

Usually when I get a craving for chocolate and peanut butter, I make something with it, stuff my face, and the craving subsides. However last week’s cookies didn’t seem to subdue my cravings, as they carried into this weekend. I was wondering what I should make, and I kept trying to think of how I wanted to marry these two amazing flavors.

And then I found it.

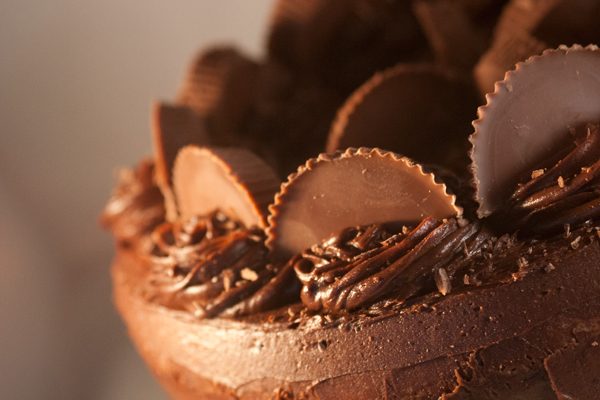
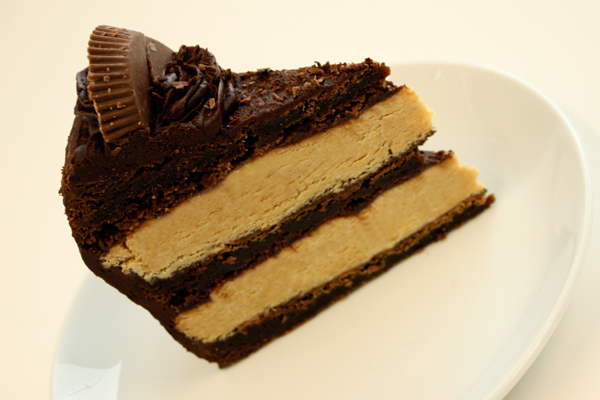
I was perusing one of my favorite baking blogs, Sprinkle Bakes, when I found this recipe for her peanut butter cup brownie cake: three dense chocolate brownie layers separated by creamy peanut butter. I couldn’t resist. I had to make it.

And boy was this a monster! This cake was so tall that the Reese’s cups on top were scraping the top of my cake carrier, easily crowning it as the tallest cake I’ve made to date. But it was delicious and it totally cured my craving.

Sprinkle Bakes recommends very thin slices (25 slices per 9-inch cake), and that was seriously correct. In fact, the richness of this cake lended itself to making it one of the few of my bakes to last two days in our office – and that’s quite an achievement.

So if you decide to bake this cake, proceed with caution. And if you get a massive sugar rush, don’t say I didn’t warn you! 🙂

Ingredients

For the brownie layers:

  • 1 1/2 cups (345 grams) butter
  • 6 ounces baking chocolate, chopped
  • 3 cups sugar
  • 5 eggs
  • 1 1/2 teaspoons vanilla
  • 1 1/2 cups flour
  • 3/4 teaspoon salt
  • 1/2 teaspoon salt
  • 1/2 teaspoon baking soda
For the peanut butter layers:
  • 6 cups icing sugar
  • 2 cups creamy peanut butter
  • 1/2 cup (115 grams) butter, melted
  • 1/4 cup double/heavy cream
For the chocolate frosting and decorating:
  • 1 1/2 cups (345 grams) butter, softened
  • 1 1/4 cups icing sugar
  • 1/2 cup cocoa powder
  • 2 teaspoons vanilla
  • 2 teaspoons brewed coffee
  • 8 peanut butter cups, cut in half
  • chocolate shavings

Directions

1. First make the peanut butter layers. In the bowl of your mixer, blend together the icing sugar, peanut butter and melted butter until it forms a crumbly mixture. Add the cream 1 Tablespoon at a time until it forms a thickened dough that you can work with (like sugar cookie dough). It should hold together if you squeeze it into a ball. Line two 9-inch cake tins with parchment and butter the pan. Then divide the dough evenly between the two pans, and press it firmly into each tin to form the peanut butter layers. Place them in the freezer to set while you make the brownie layers.

2. Next, make the brownie layers. preheat your oven to 350°F (175°C). Grease 3 9-inch cake tins, line with parchment, and flour each pan.

3. In a large saucepan over medium-low heat, melt the butter and chocolate, stirring until smooth. Once everything is melted, remove the pan from the heat and whisk in the sugar, followed by the eggs. Stir in the flour, salt, and baking soda.

4. Divide the dough between the three prepared cake tins and bake for about 25 minutes until they’re done. Allow them to cool in the pan for 10 minutes before turning out to cool on a wire rack completely.

5. Once everything is cool, prepare your frosting. In the bowl of your mixer, beat the butter and icing sugar together. Switch the attachment to the whisk, scrape down the sides of the bowl, and beat again until light and creamy.  Next, add in the cocoa powder, vanilla, and coffee. Mix on high until everything is incorporated and the mixture is light and airy.

6. Now you’re ready to assemble. Place your first brownie layer on the base and coat with a very thin layer of your frosting. Next, turn out one of your peanut butter layers and place in on top of the brownie layer. Coat the peanut butter layer with a small amount of coffee, then repeat. Your layers should be: brownie, peanut butter, brownie, peanut butter, brownie.

7. Once all of your layers are assembled, coat the top and sides with another thin layer of frosting, Place the rest of your icing into a piping bag and use it to pipe 11 rosettes around the top rim of the cake, and 4 more in the middle. Place each Reese’s cup half into each rosette. To finish it all off, sprinkle some chocolate shavings over the top of the entire cake.

pbcake2


pbcake


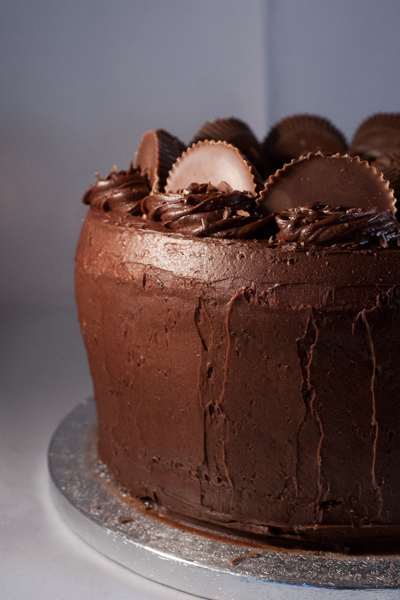
(Just ignore the slight leaning of my cake. It still tasted good!)

Advertisement

Baby Gender Cake

duckcake

One of the girls at work, Sarah, is expecting her second baby this summer.  On Friday, she had her scan to find out whether she’s having a boy or girl – so I asked if I could help her announce it to the rest of the team.  When she cut into this cake, it was dyed pink to announce her soon-to-arrive little girl.

This cake was only the second time I’ve worked with fondant, but I found that it was a bit easier the second time. To make everything, I used my sugar cookies recipe, and the rainbow cake recipe (divided into three layers instead of seven).

Congratulations, Sarah!

duckcookies_1

duckcookies_2

duckcookies_3


Chocolate Gingerbread Cake

GingerbreadCake_3

So I hadn’t mentioned this earlier, but I sent in an application for the next series of the Great British Bake Off. One day, I received a very interesting phone call – one of the people who works on the show; he asked me a few questions and then asked if I would like to come in for an in-person interview for the next round of auditions. Of course, I said yes!!

I don’t know how I managed to stay so calm during my interview, I’m pretty sure I was speaking a mile a minute and I felt like my heart was going to burst out of my chest. As soon as I got off the phone, I ran back upstairs to my desk at work with a grin bigger than the Cheshire Cat’s. I was going to audition. I had been selected out of thousands of applicants to have a chance to prove my baking skills.

I was given the instructions to bring some examples of my baking to show off my skills, and instantly my mind starting spinning – what should I make? I wanted something that would be a showstopper. Something that would represent me and my American-ness. Me and my Southern-ness. So I instantly thought to a recipe from Southern Living that I had been eyeing for some time – a chocolate gingerbread cake.

The following weekend, I did a trial bake to take to work for feedback. After a few suggestions and a bit of tweaking, I think I nailed my final recipe. I ended up making this cake three times – once for work as a trial, once for the audition, and a third time for Christmas Eve dinner to share with my family (who are probably more excited at my prospect than I am, as they immediately started planning out plot lines and how they’d ‘spin’ my story on the show).

Anyways, this cake does take a bit of time to prep and assemble. But it is worth it – it is so moist and delicious and it just looks and tastes like the holidays. Plus, the chocolate ganache and toffee layers in between the cakes are an extra decadent treat. The key is to take your time and try not to rush through.

As far as Bake Off goes, I’m awaiting the results to see if I’m invited to the next round – but hopefully this cake impressed! So, bakers, keep your fingers crossed!

Ingredients

For the cake:

  • 1 1/2 cups dark chocolate, chopped
  • 1 16-ounce package (450 grams) light brown sugar
  • 1/2 cup (115 grams) unsalted butter
  • 3 eggs
  • 2 cups (330 grams) flour
  • 3/4 teaspoon ginger
  • 1 teaspoon cinnamon
  • 1/2 teaspoon salt
  • 3/4 teaspoon allspice
  • 1/4 teaspoon nutmeg
  • 1 10-ounce (300 ml) container sour cream
  • 1 cup hot water
  • 1/4 cup black treacle or 1/2 cup molasses
  • 1 teaspoon baking soda
  • 2 teaspoons vanilla
For the chocolate ganache:
  • 2 cups dark chocolate
  • 1/4 teaspoon salt
  • 1 14-ounce can sweetened condensed milk
  • 2 Tablespoons (28 grams) butter
  • 1 teaspoon vanilla
  • 2 Tablespoons heavy cream
For the toffee layer:
  • 400 grams dairy toffee pieces
  • 1/4 cup (57.5 grams) butter
  • milk, if needed
For the ginger whipped cream:
  • 2 cups heavy cream
  • 5-6 1/8-inch slices peeled fresh ginger
  • 6 Tablespoons icing sugar
For decorating:

Directions

1. The night before you want to bake your cake, prepare the ginger whipped cream. In a small saucepan over medium-high heat, cook the cream and ginger for 3-5 minutes of just until bubbles appear. Be sure not to let the mixture boil. Remove from the heat and let cool to room temperature. Once cool, place in a container to chill in the fridge for at least 4 hours, but overnight would be best. The colder your cream, the better it will whip!

2. When you’re ready to bake your cake, preheat your oven to 350°F (175°C). Butter and line 3 round cake tins with parchment paper, then butter the parchment paper. Next, begin your cake batter microwaving your chocolate in a bowl in 30-second bursts until melted. Be sure to stir the chocolate in between bursts to make sure it doesn’t burn!

3. In the bowl of your electric mixer, beat the brown sugar and butter at medium speed until well blended. Add eggs one at a time, followed by the melted chocolate, beating until it’s just blended.

4. Sift together the flour, ginger, cinnamon, salt, allspice, and nutmeg. Gradually add this flour mixture to the chocolate mixture, alternating with the sour cream. Make sure to begin and end your additions with the flour mixture. Beat at a low speed until everything just comes together. Next, stir together the hot water with the black treacle/molasses as well as the baking soda (this mix will foam a bit). Gradually stir the molasses mixture into the rest of the batter, as well as adding in the vanilla. Once your mixture is blended together, spoon the batter evenly into your 3 prepared cake tins.

5. Bake the cakes for 25-30 minutes, or until a cake tester comes out clean. Cool the cakes in the pans on a wire rack for 10 minutes before turning out to cool completely (about an hour).

6. When the cakes are nearly cool, prepare your toffee mixture. In a glass bowl over simmering water, place your toffee pieces and butter together. Gently heat until the butter and candy begins to melt and become runny. You’ll need this to have a fairly runny consistency in order to spread over your cake. If you need to, you can add more butter or a bit of milk to help lighten the consistency. Once the toffee is melted, quickly spread a layer over the top of two of your cakes. Be careful not to work it too hard as it cools, because it can tear your cakes.

GingerbreadCake_2

7. Next, make your chocolate ganache. Similar to the toffee, melt your chocolate pieces and salt in a bowl over simmering water. Once everything is melted, add in the sweetened condensed milk; cook for 1-2 minutes, stirring constantly until everything is smooth. Remove from the heat, then add in the butter and vanilla, stirring for 4-5 minutes until smooth. Let the ganache cool to room temperature before transferring to another bowl. Add in the cream and beat with a hand mixer on high speed until it reaches the consistency of buttercream. If you need to, you can add a bit of icing sugar to help with the consistency. Once it’s ready, spread the ganache over your toffee layers.

8. Once all of your cakes are toffee-d and ganache-d, layer them up so that the cake with nothing on it is the top layer. Then whip up your chilled ginger cream to make the frosting. Pour the cream through a fine mesh strainer to remove the ginger pieces. Beat with a hand mixer on high speed until the mixture starts to foam. Then add in your icing sugar and continue to mix on high speed until stiff peaks form. Use the whipped cream immediately and spread over your cake.

9. Finally, decorate your cake however you’d like using fresh gingerbread cookies, mint, and cranberries.

Lemon Griestorte


Today has been a very long day. Ben left to go to a conference in Poland until Wednesday, so he was out the door before 6 a.m. to catch his flight. Unfortunately for me, I’m one of those people that once I’m awake, I’m awake. So I’ve pretty much been awake since about 5 a.m.  When I decided to actually roll out of bed 2 hours later, I was greeted by the most enormous spider I have ever seen!!!

I am absolutely terrified of spiders, so I found myself frozen in the doorway, facing off against this creature who was preventing me from entering my bathroom.   Normally Ben comes to my rescue (as he did last night when he went after another giant spider that had crawled under our bed), but he’d left hours ago and I was left to fend for myself. So what else could I do but start throwing shoes at it? It was the most logical solution.  Four tosses later, and the sucker was squished under one of Ben’s boat shoes, which is where he will stay until someone braver (i.e. Mr Moxey) comes home to dispose of the evidence.

I have no idea where all these spiders are coming from all of a sudden, but hopefully that will be the last one until at least Wednesday.

Anyways, back to business. This week on the Bake Off, the challengers made flourless cakes, or tortes. Originally I had planned to make a chocolate one, but I’m afraid that chocolate is the absolute last ingredient I want to have in the house at the moment. I spent all of Thursday touring around London visiting chocolate shops, gelaterias, and patisseries for a project at work and ended up getting really sick Thursday night and felt like crap most of Friday from eating so much rich, dark chocolate. So yeah, taking a break from that.

So to find a recipe for Plan B, I went to the Bake Off authority herself, miss Merry Berry. This recipe is from her Baking Bible, and uses whipped cream and lemon curd to make a delectable filling.

Ingredients

For the cake:

  • 3 large eggs, separated (you’ll need both the whites and yolks!)
  • 100 grams sugar
  • zest from 1 lemon
  • juice from 1/2 lemon
  • 50 grams fine semolina
  • 15 grams ground almonds
For the filling:
  • 300 ml whipping cream
  • 8 Tablespoons lemon curd
  • fresh raspberries
  • icing sugar

Directions

1. Preheat oven to 350° F (approx 175°C). Grease a deep round cake tin and line both the bottom and sides with baking paper. (I don’t have a deep tin, so I used 2 8-inch tins and halved the baking time. The layers were really thin, but it worked out alright.)

2. In a large bowl, whisk the egg yolks and sugar until they are pale and have a light texture. Add the lemon juice and continue to whisk until the mixture thickens. Fold in the lemon zest, followed by the semolina and ground almonds.

3. In a separate bowl (preferably with an electric mixer), whisk the egg whites until they form soft peaks, then fold into the egg yolk mixture until it’s evenly blended. Gently pour into your prepared baking tin.

4. Bake for 30-35 minutes or until it turns a pale golden brown (I did mine for 13 minutes in the two tins). Leave to cool in the tin for 10 minutes before removing and placing on a cooling rack to peel off the baking paper and cool completely. When cool, cut the cake in half horizontally.

5. Whisk the cream until it thickens and holds its shape, then fold in the lemon curd until it’s evenly blended. Spread half of this onto the bottom layer of your cake, then place a few raspberries around the cake. Add the second layer, then top with the rest of the whipped cream mixture.

6. Add a ring of fresh raspberries around the top, then dust with icing sugar to finish it off.

Lemon Angel Food Cake


Last week was rough. There’s simply no other way to put it. My grandfather passed away on Thursday after falling and breaking his hip a few days earlier. As sad as it is, he lived for 91 amazing years and he’d been in poor health for the last few, so it’s good to know that he’s no longer suffering.

When it came to baking this weekend, I wanted something simple. I was so tired and I just didn’t want have to really think about what I was doing. So the first thing I thought of was angel food cake, it’s basically three ingredients (egg whites, flour, and sugar) plus some flavoring. To be honest, it took longer to bake than it did to whip up the batter.

I adapted this recipe from Mother Thyme, as I didn’t have any cake flour. The key is to make sure you whip all of the egg whites into stiff peaks, and then not overmix it when you add the flour. Mixing too much at that stage would get rid of all the air whipped into the egg whites and result in a flat, dense cake.


Ingredients

For the batter:

  • 10 egg whites, room temperature
  • 16 Tablespoons flour
  • 2 Tablespoons corn starch
  • 1 1/2 teaspoons lemon extract
  • 1 1/2 teaspoons cream of tartar
  • 1/2 teaspoon vanilla extract
  • 1/2 teaspoon salt
  • 1/2 teaspoon fresh lemon zest
  • 1 1/2 cups sugar
For glaze:
  • 1/2 cup icing sugar
  • 1 1/2 Tablespoons fresh lemon juice
  • lemon zest

Directions

1. Preheat oven to 350° F (approx 175°C). Grease a ring or bundt pan, making sure you get into all of the crevices as well as coating the center tube. Your cake needs to have the center tube to cook evenly as well as maintain its height.

2. First, sift together the flour and corn starch several times to ensure that they’re evenly mixed together. Set the mixture aside.

3. In a large bowl, whisk together the egg whites, lemon extract, cream of tartar, vanilla, salt, and lemon zest until the mixture reaches stiff peaks. This should take about 5 minutes on a medium-high speed.

4. Reduce the speed on your mixture and gradually add in the sugar until it just comes together. Be sure not to overmix!

5. Using a spatula, gently fold in the flour mixture – sprinkle a bit of the mixture over the top, fold in, then repeat until everything is just combined.

6. Pour the batter into your prepared bundt tin, making sure that you keep the batter even around all sides. Gently shake the pan to even it out if necessary.

7. Bake for 35-40 minutes until the top just starts to turn golden and the cake springs back a bit when you touch it. Let it cool in the pan for 10-15 minutes before turning out onto a cooling rack to cool completely.

8. To make the glaze, mix together all of the ingredients. You can add in the lemon zest if you’d like, or save it to garnish the top like I did. Once everything is combined, pour over the cooled cake and serve.