Pumpkin Chocolate Chip Cookies

pumpkinchocolatechip

The past couple weeks have once again been a whirlwind. My mom just came for a visit the past two weekends, so we spent some time wandering around London. On top of that, Ben just finished his time at university and has started a new job! All in the same week! He’ll be working in the graduate program while he finishes writing his PhD thesis.

This week, I just whipped up a quick batch of pumpkin cookies. I made these cookies last year and they were incredibly addicting. This year, I decided to ramp it up a bit by adding in chocolate chips, making them even more delectable! They were an easy bake to satisfy my sweet tooth while still allowing us to get back into our routines.

To make these super-quick cookies, check out the original pumpkin cookies recipe, and just add 2 cups of chocolate chips!

Advertisement

Caramel Apple Blondie Pie

CaramelApple

Fall, or Autumn as the Brits refer to it, is just starting to set in. I’m getting excited as we approach October – my favorite month of the year. I’m looking forward to all of the leaves changing. Our new town has a lot more trees than the last place we lived, and there’s a huge park, so we’ll be able to see a lot more of the seasonal changes that really make fall the prettiest time of year.

With the changing of the seasons comes a whole new flavour season – apples, pumpkin, and spices. Can’t beat it!

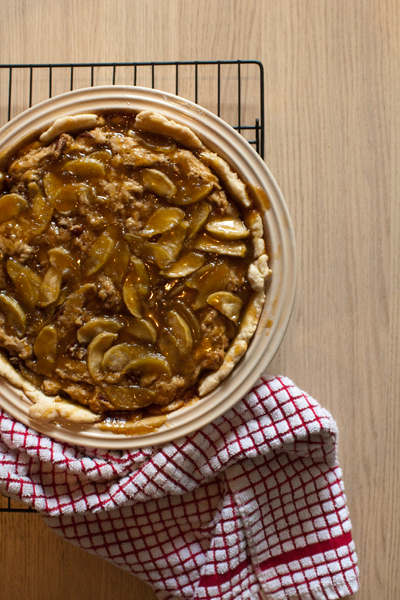
This week’s bake has been staring at me from the cover of Southern Living once again. Since Ben and I were going to a dinner party, I of course couldn’t come empty-handed. For those who haven’t heard of a blondie before, it’s basically a brownie but without the chocolate. They have pretty much the same texture, but offers a wider flavour palette to play with since you don’t have to compete with chocolate.

The recipe calls for using a cast-iron skillet (which I don’t have). I used a Le Creuset ceramic pie dish and it seemed to work alright. (Although, now I have something new to add to my Amazon list for Christmas!) It also calls for using refrigerated pie crust, but I just made up a batch of shortcrust pastry.

Ingredients

For the pie:

  • 1 batch shortcrust pastry
  • 6 large Granny Smith apples (or any type of apple that’s crips and keeps its crunch when you cook them)
  • 2 cups light brown sugar, divided
  • 1 cup (230 grams) unsalted butter, divided
  • 1 1/2 cups flour, divided
  • 1 1/2 teaspoons baking powder
  • 1/2 teaspoon salt
  • 3 eggs, lightly beaten
  • 3 Tablespoons bourbon (I didn’t have any, so I left this bit out)
  • 3/4 cup chopped toasted pecans
For the apple cider caramel sauce:
  • 1 cup apple cider
  • 1 cup brown sugar
  • 1/2 cup (115 grams) unsalted butter
  • 1/4 cup whipping cream
Directions

1. First, peel the apples, and cut into 1/4-inch-thick wedges. You’ll want to work quickly so that they don’t start to brown. Toss the apple slices with 2 Tablespoons of the flour and 1/2 cup of the brown sugar in a large bowl. Melt 1/4 cup (57.5 grams) butter in a large skillet over medium-high heat; add apple mixture, and sauté 15 minutes or until apples are tender and liquid is thickened. Remove from heat; cool completely (about 30 minutes).

2. Preheat oven to 350°F (175°C). Melt the remaining 3/4 cup (172.5 grams) butter. In a large bowl, stir together 1 1/2 cups flour and next 2 ingredients in a large bowl. Add eggs, bourbon, the melted butter, and remaining 1 1/2 cups brown sugar, stirring until the batter is blended. Stir in your toasted pecans.

3. Fit your pastry into a 10-inch cast-iron skillet, gently pressing piecrust all the way up the sides of skillet. Spoon two-thirds of apple mixture over bottom of piecrust, spreading and gently pressing apple slices into an even layer using the back of a spoon. Spoon batter over apple mixture then top with remaining apple mixture.

4.  Place pie on lower oven rack, and bake for 1 hour and 10 minutes to 1 hour and 20 minutes or until a wooden pick inserted in the center comes out with a few moist crumbs. Remove from the oven and allow the pie to cool completely.

5. To make the caramel sauce, cook the cider in a 3-qt. saucepan over medium heat, stirring often, 10 minutes or until reduced to 1/4 cup. Stir in remaining ingredients. Bring to a boil over medium-high heat, stirring constantly and allow to boil for 2 minutes. Remove from heat, and cool completely.

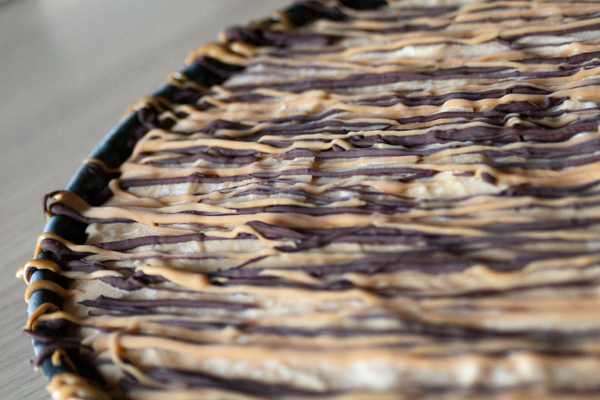
6. Once the sauce is cooled, it should be a lot thicker. Drizzle the top of the pie with about 1/3 of the sauce, then serve the pie with the rest so people can add as much as they’d like.

Chocolate Peanut Butter Pie

ChocolatePBPie_LR

It’s been a couple of weeks since Ben and I moved into our new home, and yet I still feel like I’m surrounded by boxes. Making a new space feel like your space takes time, and a lot of late nights. But things are coming along.

The biggest challenge of our new flat is having a smaller kitchen. Not so much in size, but in countertop and storage space, so we’ve had to get a bit creative in our kitchen storage, and make sure to keep everything super organised.

So my first bake in our new home is an old favorite for a site called Tracey’s Culinary Adventures. I first started making it when I moved to the UK, before I could find Reese’s cups anywhere. As I’m sure you all know, I’m pretty much obsessed with chocolate and peanut butter.

This pie is so easy, and requires minimal baking. The hardest part is waiting for the pie to chill before you can eat it!

CPBPie_LR

Ingredients

For the crust:

  • 1 3/4 cups chocolate cookie crumbs ( I used Oreos and removed the filling)
  • 6 Tablespoons unsalted butter, melted
  • 3 Tablespoons brown sugar 
  • pinch salt
For the filling:
  • 6 oz cream cheese, at room temperature
  • 3/4 cup icing sugar
  • 1 teaspoon kosher salt
  • 1 1/4 cups smooth peanut butter
  • 1 tablespoon vanilla extract
  • 2 cups heavy cream
To decorate:
  • 1 oz semisweet or dark chocolate, finely chopped
  • 2 tablespoons peanut butter

Directions

1. First make your pie crust: Preheat oven to 350°F (175°C) . Stir together the cookie crumbs, brown sugar, and salt. Pour over the melted butter and use a fork to blend into a wet mixture. Press this mixture into the bottom and sides of a 9-inch deep dish pie plate. Place the pan into the fridge for 15 minutes to set, then put into the oven to bake for 8-10 minutes. Remove and let cool completely.

2. Next, make the filling: In the bowl of your mixer, beat together the cream cheese, icing sugar, and salt. Before you add in the salt, taste your peanut butter. If your peanut butter is pretty salty to begin with, you won’t want to add any more to the filling, because it’ll make it wayyyy to salty. I find that the Tesco own label peanut butter has enough salt already and usually leave it out. Skippy peanut butter seems to work the best! Once the mixture has been beaten well, add in the peanut butter and vanilla and beat for a couple of minutes until it’s all blended together well.

3. Put the whisk attachment onto your mixer, then in a clean bowl, whisk the heavy cream until it is light and fluffy. Take about 1/3 of the whipped cream and add it to your cream cheese mixture by hand to help lighten it. Then use a spatula to gently fold in the rest of the whipped cream until all of stripes are gone and it’s evenly blended.

4.  Pour the filling into your cooled pie crust, then place in the freezer to chill for 4 hours. If you want to freeze it longer, make sure you cover it with plastic wrap.

CPBPie2_LR

5. To decorate, melt the chocolate and peanut butter separately (You can melt the peanut butter on low heat on the stove top), then put each into a ziploc bag. Snip the corner of the bag, then quickly zig-zag across the top of your pie. Don’t worry about being precise, the faster you do it, the better it works!

Packing up

1004509_439091702872404_2020354916_n

Exciting things are happening in the Pajama Baker flat! Ben and I are moving!! So I’m taking this opportunity to give the ol’ KitchenAid a deep clean before he gets packed away for the move.

Needless to say, I may be MIA for a bit while we get ourselves packed up and subsequently unpacked. But I can tell great things are happening, so stay tuned bakers!


Hummingbird Cake

HummingbirdCake_LR

I’ve always seen recipes for hummingbird cake, but have never quite figured out exactly what it actually is. A cake with bananas, pecans, pineapple – surely it just seems bizarre! Like it’ll just be a big lumpy mess of cake! I never really understood the appeal, but decided to give it a shot after I saw this recipe on the cover of Southern Living.

This cake in particular has a cream cheese custard filling and what’s supposed to be browned butter frosting. But I chickened out in the middle of browning my butter – I didn’t want it to burn!

Despite my skepticism, this cake turned out pretty well! It was a big hit at work, so there must be something magical about the strange combination of ingredients.

Ingredients

For the cake:

  • 3 cups flour
  • 2 cups sugar
  • 1 teaspoon baking soda
  • 1 teaspoon salt
  • 1 teaspoon cinnamon
  • 2 cups chopped overripe bananas (about 3 medium bananans)
  • 3 eggs
  • 1 cup chopped toasted pecans
  • 1 cup vegetable oil
  • 1 8-ounce can crushed pineapple, undrained
  • 2 teaspoons vanilla
For the cream cheese custard filling:
  • 3/4 cup sugar
  • 1/3 cup flour
  • 3 eggs
  • 1 1/2 cups milk
  • 1 8-ounce package of cream cheese, softened
  • 1 Tablespoon vanilla
For the browned butter frosting:
  • 1 cup (230 grams) butter
  • 16 ounces icing sugar
  • 1/4 cup milk
  • 1 teaspoon vanilla

Directions

1. The night before, make your cream cheese filling. Whisk together first 2 ingredients in a heavy saucepan, then whisk in eggs and milk until smooth. Cook over medium heat, whisking constantly, 8 to 10 minutes or until mixture reaches a chilled pudding-like thickness. Bring to a boil, whisking constantly, and allow to boil for 1 minute. Remove from heat, and whisk in cream cheese and vanilla until cheese melts. Cool to room temperature (about 1 hour). Place plastic wrap directly on mixture (to prevent a film from forming), and chill 6 to 24 hours.

2. The next day, make your cake.Prepare 4 9-inch round cake tins by greasing and lining the bottom with baking paper. Preheat your oven to 350°F (175°C). Mix all of your dry ingredients together, then add in the rest of the ingredients to create a moist batter.

3. Bake for 20-25 minutes or until your cake tester comes out clean. Remove from the oven and allow to cool on a wire rack for 10 minutes, then remove the layers from their pans and allow them to cool completely. 

4. Put together your cake layers by spreading a portion of the cream cheese custard in between each layer. Cover your cake with plastic wrap and place in the fridge to cool while you make your frosting. 

5. Finally, make your frosting. Cook butter in a small heavy saucepan over medium heat, stirring constantly, 8 to 10 minutes or until butter begins to turn golden brown. (This is the part where I chickened out!) Remove pan immediately from heat, and pour butter into a small bowl. Cover and chill 1 hour or until butter is cool and begins to solidify.

6. Beat butter at medium speed with an electric mixer until fluffy; gradually add sugar alternately with milk, beginning and ending with sugar. Beat at low speed until well blended after each addition. Stir in vanilla.

7. Once your frosting is finished, frost your cake.

The frosting on my cake is called a basketweave. To do this, you’ll need A LOT of frosting, so you’ll want to double the recipe to make sure you have plenty to get the job done!