Pretzel Rolls

PretzelRolls_04

It’s been a busy couple of weeks here in London! If that means anything, it means that spring is on its way. Projects have been picking back up at work, my dad came for a visit over the Easter holidays, and Ben got a job offer for when he finishes his PhD this fall. Now if only the weather would actually warm up and the sun would come out – then it would really be spring!

After a couple of weeks off from baking, it was time to dive back in and get my hands dirty – literally. Because this week was bread week!

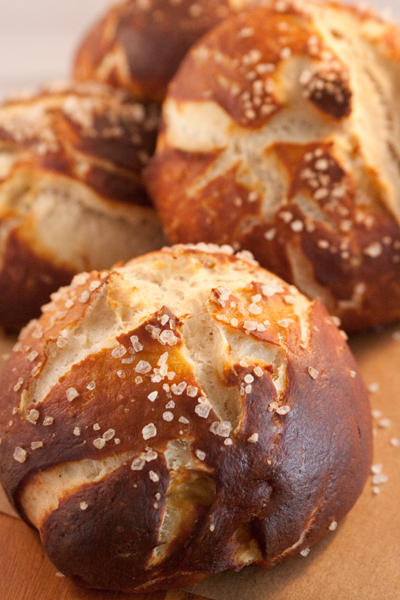
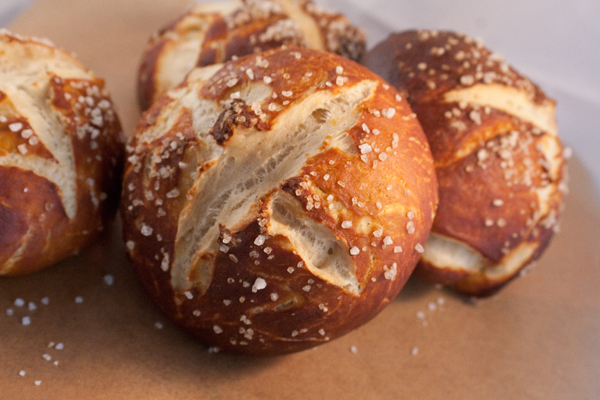
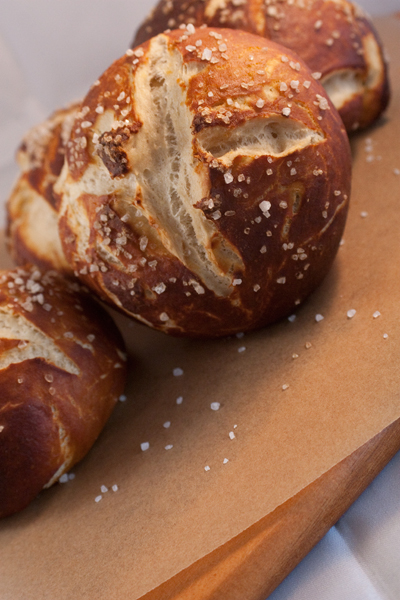
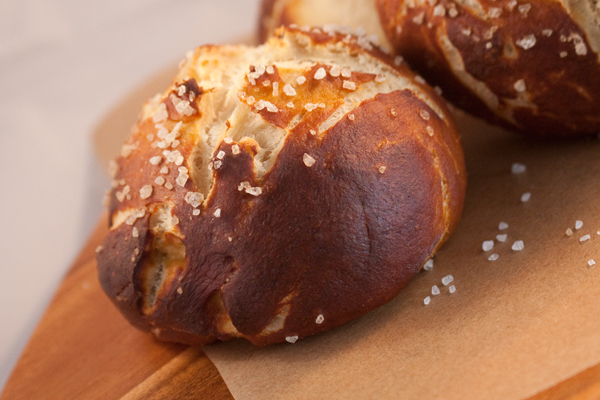
I found these pretzel rolls through Pinterest, and was instantly drawn to them. I’d actually been craving the salty, yet buttery taste of a warm, soft pretzel. Plus they were so simple – actually much simpler than normal pretzels (which was a bit of a mission last time I made them).

The recipe is pretty much exactly the same, just a smaller batch and using water instead of milk.  I also noticed that the dough was a bit more durable (for want of a better word) – so it would work really well for making normal pretzels too. This recipe makes 8 3-inch (ish) rolls, which are perfect for sandwiches – a few slices of roast beef, a bit of mustard, and you’re golden. Or, you can be like me and just tear them apart and eat them straight from the oven.

PretzelRolls_02

Ingredients

  • 1 1/2 cups warm water
  • 2 Tablespoons brown sugar
  • 1 packet active dry yeast
  • 5 Tablespoons (72 grams) butter, melted
  • 2 1/2 teaspoons salt
  • 4 cups bread flour
  • olive oil
  • 3/4 cup baking soda
  • coarse sea salt

Directions

1. In the bowl of your mixer fitted with a dough hook (or just a large bowl), pour in the warm water, brown sugar, yeast, and melted butter. Give them a gentle stir to bring them together, then allow them to sit for 5 minutes to allow the yeast to activate.

2. Mix together the flour and salt in a separate bowl so that the salt won’t come in direct contact with the yeast, because this would kill the yeast. Once they’re mixed, add them to your mixer and mix on a low speed until everything is combined. Increase the speed to medium and allow the dough to knead for 3-4 minutes, until it pulls away cleanly from the sides of the bowl.  You can knead the dough by hand if you’d like – it’s a good workout for the arms!

3. Coat a clean large bowl with a bit of olive oil to help prevent the dough from sticking to it. Place the kneaded dough in the bowl, cover, and allow to rise until it’s doubled in size – about an hour.

4. When your dough has risen, preheat your oven to 425°F (210°C) and line two baking sheets with parchment paper. Bring a pot of water to boil, then slowly add in the baking soda. Don’t add it too quickly, because sometimes it’ll bubble over. PretzelRolls_03

5. Divide your dough into 8 evenly-sized chunks (or make them smaller, bite-size rolls if you’d like – just remember to reduce your baking time) then shape them into a nice roll. Place each dough ball into the boiling water for 30 seconds. This will give your rolls the deep brown colour that’s characteristic of pretzels! Set each roll on your prepared baking sheet and sprinkle liberally with the sea salt while it’s still wet, then cut an ‘X’ into the top of each roll.

6. Bake your rolls for about 15 minutes until they reach that deep golden brown. Once finished, remove them immediately onto a wire rack to cool so that the bottoms don’t get soggy. Then either eat them on their own or slice and make into sandwiches! These rolls will easily keep 2-3 days if kept in a paper bag, or covered in a clean cloth. Don’t put them in plastic containers or bags, because the moisture will condense and make your rolls soggy.

PretzelRolls_05


Advertisement

Raisin Scones

scone_2

So apparently the UK has the same reaction to snowfall as my hometown: panic and everything shut down.  While I will admit, it was snowing pretty hard on Friday, it wasn’t really the doomsday blizzard that everyone had predicted to strike. But due to trains not really being able to run, I was allowed to leave work early before the trains stopped and work from home in the afternoon.

Shortly after lunch on Friday, I slipped and slid my way to the Tube station to make my way home. (I had worn the worst possible boots for ice – they had no grip whatsoever.) As I smiled to myself for having the survived my icy trek without my butt meeting the pavement, I stepped onto the escalator to begin my descent to the train platform.

And that’s when disaster struck. Suddenly I found myself rapidly descending, arms flailing and legs arching up over my head, only to come crashing down onto the escalator step.  I quickly untangled myself and returned to a full and upright position, really only feeling the pain to my pride more than anything.

I guess I hit the ground a lot harder than I thought, because Saturday came and I was in absolute pain. After a trip to the store where I hobbled around, unable to venture away from my shopping cart, I was relegated to the sofa for the next 24 hours. And the pain wasn’t the worst of it – mostly I just got BORED. I can’t sit still that long! Plus, Ben insisted I needed to stay horizontal, and so he began waiting on me hand and foot – another insult added to injury, because even though I like to be waited on every now and then, there comes a point where it’s just silly.

So this afternoon I decided to attempt scones. They’re simple enough and didn’t require a whole lot of hand-kneading, so I just used my mixer for everything and I managed to get away with standing for about an hour or so before I gave in and laid back down on the sofa. But at least this time when I returned to my seat, I had warm scones and jam to keep me company.

scone_3


This recipe also come’s from Paul Hollywood’s 100 Great Breads.

Ingredients

  • 4 cups bread flour
  • 2 eggs beaten, plus 1 egg beaten for an eggwash
  • 1/3 cup sugar
  • 1 1/2 Tablespoons baking powder
  • 188 grams unsalted butter, softened
  • 1 cup milk
  • 1/2 cup raisins

Directions

1. Preheat your oven to 425°F (220°C). Line a baking sheet with some parchment and set aside.

2. In the bowl of your mixer using the paddle attachment, mix together the flour, 2 eggs, sugar, baking powder, butter, and milk. Beat them for about 2 minutes on slow speed until the dough comes together.

3. Tip the dough out onto a lightly floured countertop, and gently knead in the raisins –  just enough to incorporate them into the dough. Then use your rolling pin to roll the dough out until it’s about 2 inches thick. Then using a round biscuit cutter, cut out the biscuits and place them onto your prepared baking sheet.

4. Brush your eggwash over the top of each biscuit. Then chill them in the fridge for 30 minutes – this will help them with a straight rise. Once removed from the fridge, recoat the tops of the biscuits with the eggwash.

5. Place them in the oven and bake for 15 minutes, then place on a wire rack to cool.

scones_1

Chocolate and Sour Cherry Bread

sourcherrybread

Happy New Year, bakers!

My blog is now officially one year old. Some weeks it was a struggle, but I managed to bake something nearly every week. (There were a few I missed due to travelling.) But I said I’d do it, and I did!

Ben and I flew back to the US to visit my family for the holidays. We visited lots of people, shared many laughs, and ate lots of food. So much food that I think we were sick of the sight of it by the end of the trip!  After a couple of weeks off, we’re both ready to get back into gear.

The question on everyone’s lips at home was asking about Great British Bake Off – well, at this point, I haven’t heard anything about my audition or if I’m invited to the next round. I’ve got everything crossed in hopes I’ll hear something soon though! If anything, no news is good news because it means I’m still in contention!

I didn’t bake last weekend because we landed Sunday morning and were severely jetlagged, so I had to wait until this weekend to get back to baking.

One of the books I got over the holidays was Paul Hollywood’s 100 Great Breads. Seeing as I need to beef up my bread-making skills, it was perfect. It has so many great flavors and recipes to try – and many of them are perfect for adding my own flair too!  So this week’s recipe comes from his book, I didn’t adjust too much, except for using a different yeast (I used active dry yeast rather than instant) because it was all I had in the cupboard. But this bread still turned out amazing!

It has a wonderfully crisp crust and the flavor is fantastic. I could have eaten both loaves in one sitting – but then I’d get fat. So instead, I sent one home with Ben’s mom, who stopped by today for a visit, and split the other one with Ben.

photobooth

Oh! I almost forgot to mention: one of my Christmas gifts from my grandmother was a pop-up photo studio with lights and everything! Hopefully now that means I won’t have to worry as much about the awful lighting in my flat, and hopefully my photography will get better this year – that’s the goal for 2013!

Ingredients

  • 4 cups strong white flour, plus more for dusting
  • 2 teaspoons salt
  • 2 Tablespoons olive oil
  • 15 grams (2 packets) active dry yeast
  • warm water (about a cup, but you may need more)
  • 1 can black cherries (make sure you take the stones out and roughly chop them)
  • 200 grams chocolate chips

Directions

1. In a large bowl, mix together the flour, salt, olive oil, and yeast. Be sure to keep the yeast away from the salt to start with – as salt kills yeast. Slowly add warm water and mix until you get a soft, pliable dough. Only add enough water to bring everything together, you don’t want the dough to be too wet.

2. Once everything is mixed, turn your dough out onto a lightly floured surface and knead for about 5 or 6 minutes. (I tested it to see how stretchy it was before I finished kneading.) Coat your bowl with a bit of oil, then place the dough back in, cover and let rise for an hour.

3. Once the dough has risen, line two baking sheets with some baking paper then divide your dough into two halves. Add half of your cherries to each half, then mix them into the dough. Add a bit more flour if the dough gets too wet, just work it in as you work in the cherries.

4. Next, add in the chocolate chips; again, splitting them between both halves and working them into the dough so everything is pretty much evenly distributed.

5. Form your dough into two balls, then place on your baking sheet. Gently press them down, flattening them until they’re about 2 inches thick. Dust them heavily with flour and score diagonal lines into the top with a sharp blade. Set both of them aside to rise for an hour.

6. Preheat your oven to 400°F (200°C). Once heated, bake both loaves of bread for 20-25 minutes, then transfer them to a wire rack to cool so that the bottoms don’t get soggy.

sourcherrybread_2This bread tastes fantastic, especially as a bed-time snack!!

Basic White Bread


When talking to my coworkers this week about what I should bake next, we all kind of agreed that I needed to try something savory. I have a serious sweet tooth, and I think baking with sugar is the best kind of baking. But, they were right, sometimes you just need to do something a bit more everyday.

This week I tried my hand at baking sandwich bread. Plain ol’ white bread. I’d made bread before, but never anything in a loaf pan. And with so few ingredients, white bread is a true test of bread-making. It’s pretty easy, but you just have to make sure you knead it correctly.

The Kitchn has a great recipe and a great tutorial on how to shape a bread loaf so that it turns out beautifully. I’d recommend following their technique if you want a uniform loaf.

Ingredients

  • 2 teaspoons (1 packet) active dry yeast
  • 1 cup warm water
  • 2 Tablespoons unsalted butter, melted
  • 1 cup milk
  • 2 Tablespoons sugar
  • 1 Tablespoon salt
  • 5 1/2 cups flour (plus extra for kneading)

Directions

1. Pour the warm water into the bowl of your mixture. Make sure it’s warm, not hot. Sprinkle the yeast over the top of the water and let it sit for 5 minutes, until the yeast dissolves.

2. In a small bowl, mix together the melted butter, sugar, salt, and milk. Add this mixture along with 1 cup flour into the bowl with your yeast and stir until it comes together in a loose, lumpy batter.

3. Gradually add in another 4 1/2 cups flour as you are mixing sot that the dough begins to form. At this point, switch to the dough hook on your mixture to knead for 6-8 minutes. Or, if you’d prefer, knead it by hand until the dough is smooth, yet slightly tacky. If you poke it, the dough should spring back a bit. If the dough is too sticky as you’re kneading, just add a dusting of flour.

4. Coat a large bowl with a bit of oil, then place in your dough. Cover the dough with plastic wrap and place it in a warm place to rise for about an hour until it doubles in size.

5. Dust your countertop with a bit of flour and turn out your dough. Divide this into two even balls and let them rest for 10 minutes.

6. Grease two loaf pans, then shape each ball into a loaf and place in the pans, making sure the tops are taught to help them rise. Let them rise a second time for 30-40 minutes, until the dough starts to dome up over the edges of the pan.

7. Preheat your oven to 425°F (215°C) halfway through the second rise. Once you’re ready to bake your loaves, slice the top of the loaf down the length, then place into the oven. Immediately turn the oven down to 375°F (190°C).

8. Bake for 30-35 minutes until golden brown. The loaves are done when they sound hollow when tapped on the bottom. Remove them from their loaf pans and let them cool completely on wire racks.

Sun-dried Tomato, Rosemary, Basil, and Parmesan Bagels


The second part of the GBBO bagel challenge involved making a dozen savory bagels. So to think of something to go along with my Cranberry, Orange, and Cinnamon Bagels, I had to do a bit of thinking.

I decided to do a bagel involving some fresh herbs that I’ve been growing in my balcony garden: rosemary and basil. These bagels really turned out well, and I think that they were my favorite of the two (they were certainly Ben’s favorite!).

Again, thanks to Annie’s Eats for the base recipe.

Ingredients

For the starter sponge:

  • 1 teaspoon instant yeast
  • 4 cups bread flour
  • 2 1/2 cups water, room temperature
For the dough:
  • 1/2 teaspoon instant yeast
  • 3 3/4 cups bread flour
  • 5 Tablespoons sugar
  • 2 3/4 teaspoons salt
  • 1 Tablespoon honey
  • 1 small jar of sun-dried tomatoes, drained
  • 1/4 cup fresh basil, chopped
  • 1/4 cup fresh rosemary, chopped
For boiling:
  • 1 Tablespoon baking soda
  • cornmeal or semolina for dusting
  • 1 cup parmesan cheese

Directions

1. First make the starter by mixing the yeast and flour in a large bowl. Slowly pour in the water, stirring until it forms a smooth, sticky batter. Cover the bowl with plastic wrap and let sit at room temperature for 2 hours until the mixture starts to form bubbles and get foamy. It should be about double in size.

2. Next make the dough by adding the additional yeast to the bowl with your starter. Then add in 3 cups of flour, sugar, salt, and honey. Mix using your dough hook until the mixture forms a ball. As it starts to come together, slowly add the last 3/4 cup flour until the dough starts to stiffen. Then add in the sun-dried tomatoes and herbs.

3. Knead the dough for about 10 minutes on the countertop. There should be no raw flour – all the ingredients should be hydrated.  If the dough seems dry and rips, add a few drops of water and continue kneading.  If the dough seems tacky or sticky, add more flour to achieve the stiffness required.  The kneaded dough should feels satiny and pliable but not be tacky.

4. Weigh the ball of dough, then divide the weight by 12. Then use that number to divide the dough into twelve rolls of equal weight. Cover the rolls with a damp towel and let them rest for about 20 minutes.

5. Line a few baking sheets with baking paper and spray with a small amount of oil. Form the dough rolls into bagel shapes either by rolling into snakes and then making into a loop, or just by poking a hole through the middle. Be sure to make the hole double the size than what you want the final hole to be, as they will close up a bit when rising and baking. Spray the tops of the bagels with a bit more oil, then cover with plastic wrap and let sit for another 20 minutes.

6. Your bagels will be ready for the next step when they pass the “float test”. Fill a large bowl with water and drop one of the bagels in – if it starts to float within 10 seconds, they’re ready. If not, return to the pan, re-cover with the plastic wrap, and allow them to rest longer, checking every 15 minutes to see if they float. Once they float, place the bagels in the fridge for at least 6 hours, or preferably overnight, to retard.


7. When you’re ready to bake, preheat the oven to 500°F (260°C). Bring a large, wide pot of water to boil, then add the baking soda. Line a few more baking sheets with baking paper, mist with oil, then lightly dust with the cornflour or semolina.

8. Remove the bagels from the fridge and gently drop as many that will comfortably fit into the water. They should float quite easily within 10 seconds. Boil for 1 minute, then flip and boil for another minute. Remove the bagels from the oven with a skimmer or slotted spoon, place onto the prepped baking pans then sprinkle with the parmesan cheese.

9. After all of the bagels have been boiled, place in the preheated oven for 5 minutes, then rotate the two pans, lower the oven to 450°F (230°C), then continue to bake for another 5 minutes until they turn golden brown.


10. Remove the bagels from the oven and allow to cool for at least 15 minutes before serving. If you’re storing the bagels, they’ll keep for 2-3 days in a paper bag.